Plugins for Photoshop, Elements, Lightroom, PSP & others
Plugins for Photoshop, Elements, Lightroom, PSP & others
Applying the Edges in PSP
I. The Quickest Way
1. Open an edge file from the edges sub folder in PSP.
2. Open a photo file.
3. Choose Arithmetic from the Image menu.

4. Make sure the photo file is set in the Image #1 box and the edge file is selected in the Image #2 box. Choose Darkest from the Function frame and make sure that the All channels check box is activated.
5. Finally press OK.
6. A new image window with the edge applied to the photo will appear. Now you can close the photo and edge files and save the result from the new window.
The above instructions result in a black background. To achieve a white background, apply Negative Image from the Color menu after opening the edge file and select Lightest instead of Darkest in step 4.
II. The Advanced and Easy Way
1. Open an edge file from the edges sub folder in PSP.
2. Open a photo file.
3. Activate the photo window and choose New | From Image from the Mask menu.
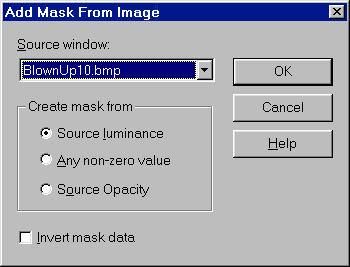
4. In the "Add Mask From Image" dialog select the edge file in the "Source window" combo box and "Source Luminance" in the "Create mask from" frame. Make sure "Invert mask data" check box is deactivated.
5. After pressing OK, the edge will be applied as a mask onto the photo.
6. Select Merge | Merge All (Flatten) from the Layers menu to make the background opaque again.
III. The Advanced Way
1. Open an edge file from the edges sub folder in PSP.
2. Open a photo file.
3. Activate the edge window and choose Resize from the Image menu and enter the pixel size of the photo file to adapt the edge to the size of the photo.
4. Press <Ctl + A> to select the whole edge and press <Ctl + C> to copy it to the clipboard.
5. Switch to the other photo window and press <Ctl + L> to paste the edge as a layer into the photo.
6. Select Properties from the Layers menu.

7. In the Layer Properties dialog choose Multiply from the Blend Mode combo box and press OK.
8. Select Merge | Merge All (Flatten) from the Layers menu to make the background opaque again.
Using the above instructions will result in a black background. To get a white background at the end, apply Negative Image from the Colors menu right after step 1. And in step 7 select Screen as the blend mode instead of Multiply.