HTML Shrinker Pro offers three ways of shrinking files:
The Light Version of HTML Shrinker only offers possibility 1.
1. Shrinking individual files
Shrinking individual files can be useful when you edited a single or a few files and want to shrink them again. It can also be used to gather some experiences with HTML Shrinker when using it for the first time.
Shrinking individual files is easy. All you need to do is to select the files you wish to shrink in the file list and to press the Shrink button or to choose 'Shrink' from the file menu. The result of the shrinking process can be seen in the text field to the right.
2. Shrinking whole folder trees (Pro Version only)
If you want to shrink the files of a complete web site (which usually consists of files within several folders), you should consider shrinking a whole folder tree with the 'Shrink All' command. With this method you don't need to select any file. You just need to select the root folder of your web site (where the main html file of your web site is located) in the folder box.
The 'Shrink All' command will shrink all files in the root folder of your web site. But it will also shrink all files located in the sub folders with in the root folder. HTML Shrinker will go down the complete folder hierarchy and shrink every file it finds.
This command saves you a lot of work. Imagine you would have to select all file of your web site without this command. As 'Shrink All' is so powerful, it can also cause a lot of damage if you don't apply it carefully.
3. Shrinking text on the clipboard (Pro Version only)
Sometimes you might just want to shrink html code while you are still editing a web page. The ability to shrink html code on the clipboard will let you fulfill this wish conveniently.
In order to start, select the appropriate html code e.g. in your favorite html editor and copy it to the clipboard. After switching to HTML Shrinker select 'Shrink Clipboard' from the File menu or press the Ctl and B keys to shrink the html code on the clipboard.

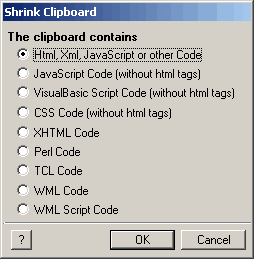
In the Shrink Clipboard dialog select the type of code you have placed on the clipboard. Normally the first option which is selected by default will be what you need. In the rare case that pure JavaScript or Visual Basic or CSS code without html tags, XHTML code, Perl code, TCL code, WML code or WML script code is stored on the clipboard, please select the appropriate option.
After pressing OK and returning to your favorite html editor you just have to use the paste command to replace the original code with the shrunken one.
4. Shrinking files or folder from the Windows Explorer (Pro Version only)
Read about this option on the Explorer Context Menu page
5. Dragging and Droping files or folders from the Windows Explorer (Pro Version only)
You can drag and drop files and folders from the Windows Explorer to the HTML Shrinker dialog to shrink them. After you dragged and droped them the Backup dialog will appear unless you selected the "Suppress the Backup Dialogs" check box in the Options dialog.
6. Simulating Shrinking (Pro Version only)
Sometimes you may want to know how many bytes you would save by using HTML Shrinker on a certain file or on a whole web site while leaving the original files untouched. Using the Simulate Shrinking command from the File menu lets you do that. It shrinks the files in memory without saving them and gives you a shrinking report. The shrinking report tells you how much you would save for each file or the whole web site.
To simulate the shrinking of a few selected files, select the files, choose "Simulate Shrinking" and press the Yes button in the appearing dialog. To simulate the shrinking of all files and sub folders, choose "Simulate Shrinking" and press the No button in the appearing dialog.
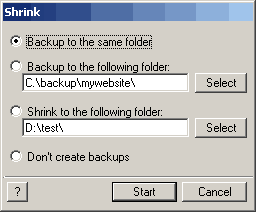
When shrinking individual files or complete folder trees a dialog with various backup options will appear before the shrinking is done. The dialog will look like this:

This dialog offers four backup alternatives: backing up the original files in the same folder, backing up the original files in a specific folder, placing the shrunken files in a specific folder or shrinking the files without creating any backups. In the Light Version of HTML Shrinker only the first and fourth options are available.
Backing up to the same folder as the original files means that the original files will be renamed by adding ".bak" at the end of the file name while the shrunken versions of the original files will be saved with the file names of the original files. This option is set by default and is recommended if you want to be able to revert the shrinking process very quickly or compare the original and the shrunken files.
When creating backups in a specific folder (Pro Version only) you firstly need to enter or select a folder. During the shrinking process the original files will be moved to the new folder and the shrunken versions will be saved in the current folder. This option fits if you use a visual html editor and editing shrunken code is no problem.
Shrinking to a specific folder (Pro Version only) means that the original files are left untouched and the shrunken versions will be saved in the selected or entered folder. This option should be preferred if you don't use a visual html editor or want to have the shrunken files in a specific folder for uploading.
Creating no backups is only advisable if you prefer to do backups yourself or have made enough experience with HTML Shrinker to be sure that it won't damage your files or know that you can easily correct problems in the html files. But even if these cases match to you, it isn't recommended using this option.
Pressing the Start button of this dialog will start the shrinking process. Pressing Cancel will abort everything.
TIP: You can always interrupt the shrinking process at any time by holding down the ESC key for one or more seconds.
The Shrinking Report
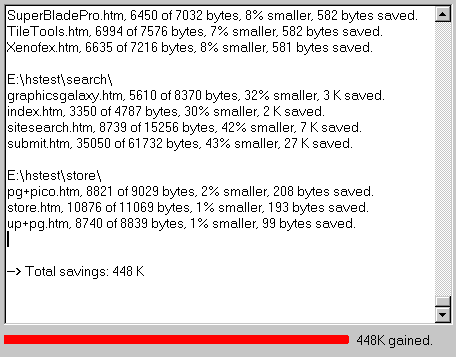
While the reporting text is already displayed during the shrinking in the Light Version of HTML Shrinker, the Pro Version displays it after all files were processed. This difference can provide an immense speed gain in the Pro Version, especially when shrinking hundreds of files. In both versions however the progress bar will indicate the processing status and display the already saved Ks.

The shrinking report usually consists of different sections representing the different folders. That's why the first line of a section tells you the path of the folder. When shrinking individual files no folder path will be displayed and the report will consist of only one section.
Each section is separate by a blank line from the other. After the first line every processed file will be displayed in a separate line. Such a line consists of the file name, the shrunken file size and the original file size in bytes, the shrinking gain in percentage of the original file size, the number of bytes or Ks that were saved and the time (in seconds) it needed to shrink the file. Sometimes a file can't be shrunken any further. In this case it is indicated by the report, too.
At the end of every report there's a line which summarizes the total saved Ks. This number is identical to the one to the right of the progress bar.