
LayerShop adds five new menu items to the Image menu of Photoshop Elements.
Supported
by Photoshop Elements 11 and higher,
already available in Photoshop
Requirements: If only one layer is selected, all layers are automatically
selected. If you want to process only certain layers, please select
them first in the Layers panel.
Added in Version 1.0, enhanced in 2.0
The Auto-Align Layers function lets you align two or more very similar photos in order to combine them to one image. This is quite useful if you want to combine multiple shots of the same subject, e.g. a group of people, photos taken with different exposure or depth of field or if you want to create a panorama image from multiple shots.
Firstly, you need to place each photo on a different layer. Best use Open As Layers or Place Documents As Layers for this task. Then you select all layers in the Layers panel and run the Auto-Align Layers command. After the layers were aligned, you can use layer masks to only add the best parts of each layer to the final image.
In the Auto-Align Layers dialog you can choose between different options for changing the projection of the images. The Auto option tries to find the best option for the corresponding image layers. It chooses between Perspective or Cylindrical projection. When creating a panorama it may choose the Perspective method, which is not always the best choice, so we recommend activating the Cylindrical option. For stacked images it is best to keep the Auto option.
The Perspective option chooses a layer as the reference image (usually the middle layer) and perspective stretches the other layers to match it. The Cylindrical option avoid the “bow-tie” distortion of the Perspective option by placing the layers on an unfolded cylinder. The Spherical option is meant for photos with wide fields of view, thus it spherically transforms the layers. The Collage option aligns the layers without changing the shape of the layers. Finally, Reposition makes sure that matching image contents overlap by simply repositioning the layers, so no transformation is applied.
An activated Vignette Removal check box tries to remove shadows at the corners of the layers. Geometric Distortion compensates barrel, pincushion or fisheye distortions.
Supported
by Photoshop Elements 11 and higher,
already available in Photoshop
Requirements: If only one layer is selected, all layers are automatically
selected. If you want to process only certain layers, please select
them first in the Layers panel.
Added in Version 1.0, enhanced in 2.0
The Auto-Blend Layers function enables you to put different images together in order to create either a panoramic scenery with seamless transitions or to increase the depth of field of macro or other types of photos. The individual photos have to be available as layers (Best use Open As Layers or Place Documents As Layers) and these layers have to be selected for this functionality to work.


The left and middle image
are two of eight photos that were combined
with the Stack Images feature to create the right image result.
If you are trying to blend panorama photos or want to combine macro shots taken
without a tripod it is advisable that you apply the Auto-Align Layers feature
beforehand in order to have the layers correctly positioned. Otherwise the result
may not be as expected.

The Auto-Blend Layers dialog offers two blend methods to select. If you want to create a panorama images, activate the Panorama option. If you want to increase the depth of field, choose Stack Images.
An activated Seamless Tones and Colors checkbox grants smooth transitions and colors. The Content Aware Fill Transparent Areas check box fills any transparent areas with image content. This may work fine with little details at the borders, but look strange in other cases. It works similar to the Content-Aware Fill check box of the Remove Transparency feature.
Supported
by Photoshop Elements 11 and higher, Photoshop CS3 and higher
Requirements: One or two layers have to be selected
Added in Version 2.0
Please check out the Blend Pro description on the Edit Menu page.
Supported
by Photoshop Elements 11 and higher, Photoshop CS3 and higher
Requirements: At least one layer has to be available
Added
in Version 2.0
The Remove Transparency command is meant to remove the transparent areas that are created by the Auto-Align Layers command. It takes the transparent areas of all layers in the current document including their layer masks and vector masks into account.
Remove Transparency either crops the transparent areas of all layers or fills a new layer with image content that hides the transparent areas. However, filling only works in Photoshop CS5 as well as Photoshop Elements 13 and higher.
If you use Remove Transparency for cropping the image, it spares you the work of manual cropping with the crop tool, which often requires multiple cropping steps, because transparent areas of one layer may be hidden behind other layers. Unlike the Trim command of Photoshop and ElementsXXL it removes not only rectangular areas but all transparent areas including irregular ones. If you use Remove Transparency for filling the image with the content-aware feature, it still saves you several clicks compared to doing it manually.
![]()
Remove Transparency offers two cropping methods. The Panorama option works best on layers that are horizontally aligned as a panorama image. The Stacked Images option is meant for stacked layers that are used e.g. for increasing the depth of field, creating HDRs and denoising. With “Stacked Images” it crops the smallest inner rectangle of all visible layers, because stacked image overlap mostly. With “Panorama” it crops the combined inner rectangle of all visible layers, because a panorama is distributed over multiple layers that only overlap very little. If there is only one layer, both options produce the same result.


The left image shows eight layers that were auto-aligned,
which resulted in very different transparent areas.
The middle image shows the eight layers on top of each other. After applying
the Remove Transparency
command with the "Stacked Images" method (and deactivated "Content-Aware
Fill" checkbox),
the image on the right was the result.
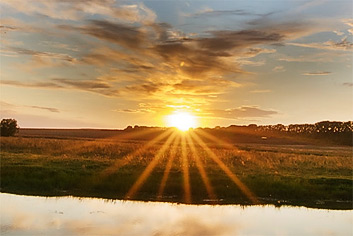
The Content-Aware Fill check box (which only works in Photoshop
CS5 as well as Photoshop Elements 13 and higher) adds a new layer with image
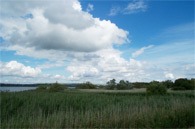
content that hides the transparent areas. Content-aware Fill works nicely if
the image borders contain textures with little details, e.g. clouds, still
water, grass, earth, plain walls etc. It does not work very well if there are
very fine details in the border areas, e.g. wires, tiles, people. In such cases
it is usually better to either crop away the transparency (by deactivating
the Content-Aware Fill check box) or to manually fill in the details with the
clone stamp or healing brush tools.
Supported
by Photoshop Elements 11 and higher, Photoshop CS3 and higher
Requirements: One, two or three layers have to be selected in the Layers
panel.
Added in Version 1.0, enhanced in 2.0
The HDR-Combine Layers feature combines two or three photos of the same scene taken with different exposure settings. You get the best HDR results if you shoot three photos of the same scene with -2/+2 or -3/+3 exposure adjustment and then use HDR-Combine on these three photos. But you can also use single photos, preferably a raw file. So here is a ranking ranging from best to worst results:
1. Three raw files of the
same scene taken with different exposure.
2. Three jpeg files of the same scene taken with different exposure.
3. One raw file
4. One jpeg file
However, sometimes you may get a slightly better result with number 3 than number 2. You may get a very similar result with all four approaches, if the photographic scene is not illuminated by an extreme light source like the sun or a lamp at night, which is when HDR makes the biggest difference. You usually get better results with raw files than with jpegs or tiffs, because raw files have a higher dynamic range, so when LayerShop automatically produces exposure variations it extracts all details from shadows as well as highlights of the raw data.

The left image is a standard raw conversion. The right image was produced
by combining three exposure variations of the same raw file.
Instead of combining images to a 32-bit HDR image and tone mapping them back
to 8-bit, this feature takes a different approach. It omits the 32-bit
step and combines the images directly with the help of layer masks. As
a result you get more a natural looking image that provides a higher dynamic
range. Additionally you are also able to improve the result by manually
editing the layer masks.

If only one layer is selected in the Layers panel, two other layers with -2/+2 EV exposure variations are automatically created. We only recommend taking this approach if you do not have differently exposed photos or do not have at least a raw file. Otherwise please use the Open as Layers command to open the photos or to automatically create exposure variations from a raw file. This certainly produces better HDR results.
If you have two or three layers selected, they are sorted and named "HDR Shadows", "HDR Midtones" and "HDR Highlights". The brightest layer is named "HDR Shadows", because it offers the most shadows details, and the darkest layer is called "HDR Highlights", because it contains the most details in the brightest image areas. After this first processing step, the HDR-Combine Layers dialog appears.

The Shadows and Highlights sliders adjust the opacity of the shadows and highlights layers. They control the intensity of the effect. The Width sliders adjust the masks of the shadows and highlights layers. The higher the value of the sliders, the more image areas from the shadows or highlight layers are introduced in the combined image. The Anti-Halo sliders enable you to remove halos in the shadows or highlights if necessary. For some images you have to use positive slider values, for others you need negative values in order to remove halos.
The Contrast and Saturation sliders control the general contrast and saturation. The Merge Layers check box combines all selected layers into one layer. This is more or less a convenience option, because you can also do that from the Layers menu later.
The Auto-Align button runs the Auto-Align Layers command discussed above. Thus it matches the image content of the selected layers. Usually it is better to auto-align layers before using the HDR-Combine Layers command. If the necessary alignment is not to extreme, it will also work fine from this dialog.
After you clicked the OK button, you can still go back to the HDR-Combine Layers dialog and change its settings. To do that make sure that you have all two or three HDR layers selected and choose Image > HDR-Combine Layers from the menu again. If you activated the Merge Layer check box before clicking OK, you have to undo the HDR-Combine Layers step in the History panel before you can enter the dialog again.
Click the Cancel button to stop everything. If you want to reset the sliders to their default settings, hold down the Alt key and click the Cancel button.
Supported
by Photoshop Elements 11 and higher, Photoshop CS3 and higher
Requirements: If only one layer is selected, all layers are automatically
selected. If you want to process only certain layers, please select
them first in the Layers panel.
Added
in Version 1.0, enhanced in 2.0
Basically the Expose Layers feature automatically adjusts the opacity and blend mode of the selected layers in order to produce different effects including denoising and multiple exposure.
 |
 |
 |
The two photos on the left were combined with the Multi-Expose option of Expose Layers.
The Denoise option calculates the average of all layers thus
reducing high ISO noise. The two Multi-Expose options create
an effect that is known as multiple exposure in traditional photography. They
allow you to combine two or more different scenes into one photo. The Light
Trail option adds light trails from photos into one image. It can also
be used to combine other night shots. Whereas
the Denoise, Multi-Expose and Light Trail options use predefined blend modes
and opacity settings, the Other option lets you freely adjust
the Mode combo box and Opacity slider.

The Mode combo box contains all blend modes known from the Layers panel of Photoshop Elements. The Opacity slider represents the option with the same name on the Layers panel. But here you are changing the blend mode and opacity of multiple layers and not just one layer. Nevertheless the bottom layer will always be set to Normal blend mode and 100% opacity to produce an usable effect.
The Brightness slider increases or decreases the brightness of the effect. Usually it is necessary for compensating the brightening or darkening effect of the Exposure option as well as certain blend modes. The Contrast slider adjusts the contrast of the combined layers.
Sometimes it may be necessary to deactivate certain layers to achieve a better effect. But you do not need to exit the Expose Layers dialog to do that. You can use the Hide slider instead, which lets you exclude certain layers from the effect. For example, a value of 1 hides the top layer and a value of 2 excludes the two top layers. On the other hand a value of -1 ignores the bottom layer and a value of -2 hides the two bottom layers. This slider is only usable if more than two layers have been selected. It can be quite helpful with the Light Trial option for animating the light trail.
The Swap button is meant to be used for creating variations when using the Multi-Expose methods, but can also be used with the other methods. Each time you click the button the layers will be swapped, which, means that their positions will change. The first number of the button text is the current layer position. The second value is the the total number of possible positrons. So for two selected layers with two possible positions, you will see "1 / 2", "2 / 2" and again "1 / 2" when you click the button twice. For three selected layers there are six possible positions, so you have to click the Swap button six times to check them all out. So the button text will display "1 / 6" up to "6 / 6". For n selected layers there are n * (n-1) possible positions, so for 4 layers that means 12 and for 10 layers already 90 possible positions. To restore the original layer position you have to make sure that a "1" is displayed as the first number on the button. The easiest way to do that is to click the Restore button.
The Merge Layers check box combines all selected layers into one layer. This is more or less a convenience option, because you can also do that from the Layers menu later. The Auto-Align button runs the Auto-Align Layers command discussed above. Thus it matches the image content of the selected layers.
Click the Cancel button to end everything. If you want to reset the sliders to their default settings, hold down the Alt key and click the Cancel button.
Supported
by Photoshop Elements 11 and higher, Photoshop CS3 and higher
Requirements: If only one layer is selected, all layers are automatically
selected. If you want to process only certain layers, please select
them first in the Layers panel.
Added in Version 2.0

The Stack Layers submenu lets you apply various stack modes to all layers or the selected layers in the current document. Stack modes work similar to blend modes. But while blend modes only work with two layers at a time, stack modes can process the pixels of all layers together. This offer many more possibilities, but also takes longer to render.
The Options menu item displays the above dialog. It lets you select the stack modes from the Effect combo box. The Settings group displays options for adjusting the stack mode. The Exposure stack mode offers a Color Correction check box for activating a color correction feature. The Median stack mode displays a Sharpen check box, which may add a sharpening effect or artifacts depending on the used images. Apart from additional options the Options dialog also makes it easier to test all stack modes instead of choosing them one after the other from the Stack Layers sub menu. Try the cursor up/down keys once you selected the combo box for quickly switching between them.
LayerShop offers a dozen stack modes. Some of them are not available in Photoshop. The native stack modes in Photoshop are applied to a smart object, whereas the stack modes of LayerShop are like filter effects that are rendered directly to a pixel layer. So after applying a stack mode you will see a new layer called "Stacking Result" at the top in the Layers panel. This layer contains the final result of applying a stack effect. Stack modes also support selections, so if you only want to apply it to a certain image area the rendering time is also reduced greatly.
The Median stack mode chooses the median pixel value of all layers. This is useful for removing pixels that are not present in all layers, which allows you to remove moving objects, remove noise or increase the image resolution. The Mean stack mode renders much faster than Median and averages the pixels on all layers. This is also useful for denoising and image resolution increase, but produces a slightly different result. The Exposure stack mode (not natively available in Photoshop) fixes the exposure of underexposed photos by combining the information that is available from multiple layers.
The Minimum stack mode selects the lowest pixel value of all layers. It works similar to the Darken blend mode. LayerShop uses it for removing moving objects if there is an even number of layers. The Maximum stack mode works like the Lighten blend mode outputting the brightest pixel of all layers.It produces a bright look and may enlarge overexposed areas.The Summation stack mode simply adds up the pixels of all layers. This results in overexposure unless you use very dark images. You could use it for a hi-key look, but it is not recommended for fixing underexposure as that is too tedious to achieve with it.
The Range, Standard Deviation and Variance stack modes select pixels according to these statistical principles. They are less useful for photo effects and more for scientific purposes. The Mask stack mode is similar to the Range stack mode, but produces a grayscaled result. You can adjust the result further to produce a mask for masking image areas that are present in all layers.
The Least Objects stack mode tries to select the layer with areas that differ the least from the other layers and copies it as a new layer. This does not work always but often enough. The Combine (Experimental) stack mode combines the different objects of all layers into one image. This feature is still experimental, so it usually adds noise and other artifacts to the output, especially if the objects of various layers overlap. We only recommend to use it only as a template or guide and combine the objects manually.
The 5 features below use various of these stack modes and offer more sophisticated features for applying them for various image processing tasks.
Supported
by Photoshop Elements 11 and higher, Photoshop CS3 and higher
Requirements: If only one layer is selected, all layers are automatically
selected. If you want to process only certain layers, please select
them first in the Layers panel.
Added in Version 2.0

The Remove Detail allows you to remove an image area by utilizing image content from other layers, which contain different images of the same scene. For this feature to work you first need to create a selection around the object or detail that you want to remove. The feature only works if another layer contains the necessary image content. If it is available, Remove Detail works much better than the Content-Aware Fill feature of Photoshop (Elements), because it uses real-life image data and does not reconstruct the area by patching together textures.
By default the Median option is selected, which essentially uses the Median stack mode to replaced the selected area. Depending on the available image material this may work more or less good. The Least Objects applies the stack mode of the same name, which tries to find the layer with the least objects or details. If both do not produce the desired result, you can click on the layer names below to copy the content of certain layers into the selected area.
Supported
by Photoshop Elements 11 and higher, Photoshop CS3 and higher
Requirements: If only one layer is selected, all layers are automatically
selected. If you want to process only certain layers, please select
them first in the Layers panel.
Added in Version 2.0
The Moving Object Removal tries to create a version of all layers that has moving objects or differing details removed.
The result highly depends on the available material. If you took too few photos and all photos have the same background detail covered, it will still leave ghost artifacts of the moving objects behind. So it is important to take as many photos as possible that contain alls background details in the first place. If an even number of layers is selected or exists in the current document, you get a warning message, because a less effective method has to be applied to get a more decent result. Then best remove or hide one of the layers and try again.
If nothing helps, you can also try the Remove Detail feature above. It often succeeds when this feature fails because of insufficient image material. The final measure is to manually remove artifacts, e,g, with the healing brush.
Supported
by Photoshop Elements 11 and higher, Photoshop CS3 and higher
Requirements: If only one layer is selected, all layers are automatically
selected. If you want to process only certain layers, please select
them first in the Layers panel.
Added in Version 2.0

The Super Resolution feature lets you increase or decrease the image size more effectively by using pixels from various identical photos of the same scene. As the camera moves very slightly when quickly shooting multiple photos, each photos contains slightly different image information. But the photos have to be aligned first, which is normally done when using the Open As Layers, Place Documents As Layers or the SuperResolution task features. Otherwise you need to run the Auto-Align Layers feature. SuperResolution also works with photos from a tripod, so handheld shots are not mandatory.
Super Resolution works much better than using only one photo, because it is able to use more image data and also decrease noise during the process.
The Size slider adjust the image size in percentage terms. The new pixel size of the image is displayed below the slider. You can increase as well as decrease the image size.
The Settings group offers three Details settings. The Soft option renders quickly and produces softer details. The Normal option renders slower and the result looks a bit less soft. The Rough option may look more natural but also contains more imperfect details. It usually is a matter of taste which option is preferred.
As the resulting image usually is a bit soft it is recommended to sharpen it. This also makes smaller details much more visible and improves the image quality. You can adjust the sharpening intensity with the Sharpen slider.
Supported
by Photoshop Elements 11 and higher, Photoshop CS3 and higher
Requirements: If only one layer is selected, all layers are automatically
selected. If you want to process only certain layers, please select
them first in the Layers panel.
Added in Version 2.0

The Denoise Layers feature combines multiple layers with photos of the same scene to remove noisy pixels. This is called Multi-Layer Denoise here and works more effectively than using only one image. But the dialog also offers a standard denoise which can be additionally applied to further remove noise.
The Multi-Layer Denoise group offers two options: Soft produces a more soft result and removes more details while also rendering faster. It is similar to the Denoise option of the Expose Layers feature. The Normal option keeps more details but also slightly more noise. But the difference between both options is rather subtle.
The Standard Denoise group offers an Amount slider for adjusting the noise reduction intensity. The Standard Denoise functionality may smooth away details, so it is better to not apply too exaggerate it.
Supported
by Photoshop Elements 11 and higher, Photoshop CS3 and higher
Requirements: If only one layer is selected, all layers are automatically
selected. If you want to process only certain layers, please select
them first in the Layers panel.
Added in Version 2.0

The Fix Underexposure feature uses multiple photos of the same scene that are underexposed (e.g. because there was not enough light available). The result is an optimally exposed image, which is not overwhelmed with noise. Brightening only one underexposed photo inevitably amplifies the noise in the image and makes degraded image details appear. This can be avoided by taking multiple photo quickly after each other and using this feature.
At the bottom of the dialog you can see how many photos would be needed to produce an optimally exposed image. If you use much less photos, the noise will be more visible. If you only use one or two less photos, there is usually no adverse effect.
The diagram at the top shows the combined histogram of all image layers.The two slider knobs at the bottom of it are automatically set to produce optimal exposure. But you can move the white knob to the left if the result still looks too dark and you do not mind a few overexposed highlights. Use the black knob to darken shadow areas. If you adjusted the slider knob and are not satisfied with the result, click the Auto button to restore the default settings.
The Color Correction check box fixes color problems which often occur for underexposed images. In some cases this correction is disadvantageous and it is better to manually correct the colors.
Supported
by Photoshop Elements 11 and higher, Photoshop CS3 and higher
Requirements: None
Added in Version 2.0
The Tasks sub menu offers seven items for almost automatically performing certain tasks, which start with opening one or more images and end with the final image result.

The Denoise task lets you combine multiple photos of the same scene taken with the same camera settings in order to reduce high ISO noise. The Depth of Field Increase task removes blur by using photos taken with a different focus point. The HDR task increases the dynamic range of a photo by overlaying multiple photos taken with different exposures. When opening only one file, exposure variations are automatically generated by LayerShop. The Light Trail task combines various light trial photos or night shots to produce a more impressive effect.The Manual Composition task opens multiple photos and adds layer masks for starting with a manual composition.
The Multiple Exposure task lets you create an analog multi-exposure effect by blending different photos. Panorama stitches panorama photos together. The Remove Moving Objects task tries to remove image areas that are different in each image. Increase Resolution lets you effectively increase the image size by utilizing the pixels in all images. The Fix Underexposure task combines a series of underexposed images to produce correct exposure while reducing noise.


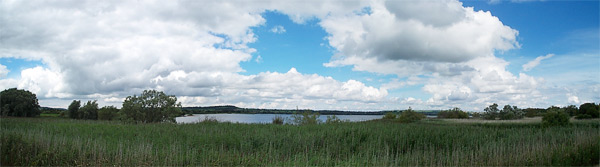
The top images were taken hand held. The bottom result was produced by using
the Panorama task.
Each task performs the following steps:
1. Lets you select or
open the images or files that the task is applied to. See below.
2. Auto-Align Layers (no dialog is shown)
3. Depending
on the task a dialog is shown or not. No dialog is shown for these tasks: Depth
of Field Increase, Manual
Composition, Panorama, Remove Moving Objects.
4. Remove Transparency (No dialog is
shown except for the Panorama task; for the HDR task this
command is executed before step 3)

After executing the task command, LayerShop checks if one or more documents exist that it can be applied to. If there is none, the Open as Layers command is triggered showing a file dialog for selecting image files.
If it finds one, the Select images dialog is displayed. The Use Current Document button applies the task to the layers of the currently active document. The Use All Open Documents button automatically creates a new document and puts all documents as layers in it by using the Place Documents as Layers command. The Open New Images button runs the Open as Layers command and displays a file dialog for selecting image files.