

The Presets tab sheet lets you select among five hundred presets sorted into more than 20 groups. When the Combine check box is activated, you can also combine presets for even more choices.
The preset list occupies the main part of the Preset tab sheet. It provides 600 preset items, which are displayed as thumbnails, icons or text items. You can switch between these different views with the arrow-down menu as explained below.
The presets are sorted into more than 20 preset groups. Each of these groups can be collapsed and expanded by clicking the group header. To collapse or expand all groups click the -/+ button above the preview.
The first item of each group is called "None" and neutralizes the effect of the presets in the same group. The first preset group is called "Own Presets" and contains only presets that were saved by you, the user. So when you run BWStyler for the first time you only see the "None" item in this group. The second and third group contains general photo and vintage presets that consist of multiple effects.
The next 12 groups (Color Film to Frame) also appear as combo boxes in Photography Mode. They contain presets that only use one effect and the presets in each group activate a different effect. So you can easily combine the presets of each group with each other by activating the Combine check box. The remaining 6 preset groups are similar as they also activate only one effect, but they contain mainly special effects and not classic photographic ones.
If you right click an item in the preset list, you see a menu with the names of the effects that the preset uses. Clicking on one of these items opens up another tab sheet and displays the appropriate effect controls. The context menu of the Color Grad presets contains seven additional menu items, which let you choose another gradient type.

Clicking the arrow-down button above the preset list displays a menu with options for opening and saving presets and for adjusting the look of the preset list.
The Thumbnail, Icons and List options let you choose between different list modes. The Thumbnails option applies the effect of each preset to a miniature version of the image. The Icons option applies the presets to images with different patterns (e.g. a blank gray image, gray tone scale, checkerboard or hue/saturation diagram). Depending on the preset group a different test pattern is used. The List option only displays text items and no visual previews of the presets.
The next five menu items (Very Large to Very Small Thumbs) define the size of the preview images in the Thumbnails and Icons modes. Very Large Thumbs only displays one thumbnail per row whereas Very Small Thumbs displays four per row. The effect of some presets is better visible with the Very Large Thumbs option, but Medium Thumbs with two thumbnails per row is usually a good compromise.
The preset thumbnails are rendered when BWStyler starts up. With a fast CPU this takes less than a quarter second at medium size and one second at very large size. With older computers it can take up to several seconds to render 500 thumbnails at very large size. So to avoid unnecessary delays, it is good to choose the thumb size wisely or to switch to List mode, which avoids rendering thumbs.
The Standalone/Lightroom version of BWStyler additionally renders the thumbnails again when you switch to another image, which can get inconvenient with a slower CPU. To avoid that you can switch to Icons mode, which does not rerender the thumbs when switching images.
Finally, the Labels option hides or reveals the text labels in Thumbnails and Icons view. This leaves more room for the miniature previews.
Apart from the preset list option on the arrow-down menu of the Preset tab sheet there are also options for opening and saving presets.
BWStyler 2 supports three types of preset files. BSP files are native BWStyler 2 files that can contain all of BWStyler's effect settings. You can open as well as save these files. BWP files were saved by version 1 of BWStyler and can only be opened by BWStyler 2. Some of these presets do not produce an 100% identical effect, because some effects were changed in BWStyler 2. Finally, ACV files are generated by Photoshop's Curve dialog and only contain curve points. When BWStyler opens such a file, it only changes the curve points in the Tone and RGB sub tabs of the Main tab sheet in Advanced Mode. BWStyler cannot save ACV files. All three preset files are shown as thumbnails in the preset list, in case they are located in the default preset folder.
Clicking Open Preset displays a file dialog for selecting and opening a preset file. This function is only necessary if you want to open a preset that is not located in the default preset folder of BWStyler. All presets of the default presets folder are displayed in the Own Presets group of the preset list and can be opened by clicking them there. The folder of the last opened preset is displayed by default in the file dialog.
You can save the current BWStyler settings as a preset file with the help of the Save Preset or Save Preset As menu item. The difference between the two is that the Save Preset option automatically saves the preset file into the default preset folder of BWStyler whereas Save Preset As additionally displays a file dialog and asks you where you want to save the preset.
The default preset folder
of BWStyler 2 is located here:
Windows 2000/XP: c:\Documents and Settings\<user>\Application Data\ThePluginSite\BWStyler2\Presets\
Windows Vista/7: c:\Users\<user>\AppData\Roaming\ThePluginSite\BWStyler2\Presets\
MacOS X: /Library/Application
Support/PhotoWiz/BWStyler2/Presets/
Both Save Preset commands display a Save Preset window, which lets you
enter a preset name and define which effect settings will be saved in the preset.
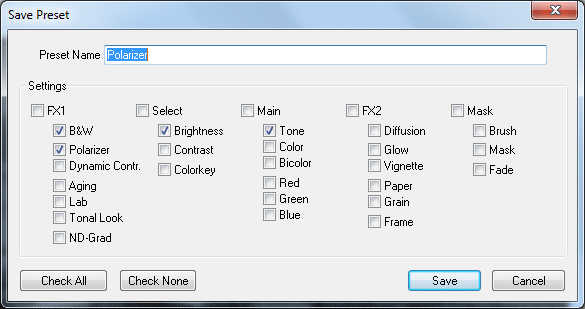
The check boxes of the used effects are automatically activated. The check boxes of the currently unused effects are deactivated. If you keep that and save your preset only with the used effects, you can later combine the saved preset with an existing effect in BWStyler. That is done by opening the preset after activating the Combine check box.
If you want your preset to deactivate all other effects in BWStyler when the Combine check box is active, you can activate all check boxes. You can do that by clicking the Check All button. The Check None button deactivates all check boxes and lets you manually choose certain effects for inclusion in the saved preset. Finally click on the Save button to save the preset file or click on Cancel to abort this action.
The Reset Preset Folder menu item sets the default preset folder as the starting folder for the file dialog of the Open Preset and Save Preset As commands. This way you can avoid searching for the default preset folder after saving or opening a preset from a different location on the hard drive.

The combo box above the preset list offers various options for choosing which preset groups are displayed. "Show All" displays all presets whereas the other options only display the presets of a certain preset group in the preset list. Displaying only one preset group means less scrolling of the preset list.
When you open a preset with a deactivated Combine check box, then all active effects are deactivated and only the effects of the preset are applied. On the other hand if you want to combine the effects of different presets, you can activate the Combine check box. Then opening a preset does not remove the active effects and additionally activates the preset effects. As a result the existing effects and the preset effects are combined. Instead of activating the Combine check box you can also hold down the Ctrl key when clicking on a preset to avoid that the active effects are removed.
However, there is an exception to this rule. If a preset contains settings for an effect that is already active, then the settings of this active effect are overwritten. This does not remove the effect, but changes it. For example, lets say you brightened up the image with the Brightness slider and added a diffusion effect. Now you activate the Combine check box and open a preset. This preset uses the same Brightness slider for darkening the image and additionally applies a red color. So you started with a brightened and diffused image and ended with an image that is darkened, diffused and colored red. The original brightness effect was changed, the diffusion effect was kept and the red color was added. The original brightening and new darkening did not compensate each other. The new darkening effect dominated.
On the other hand it is possible to save a preset that deactivates one or more effects (by activating the check box of an inactive effect on the Save Preset dialog). Opening such a preset erases existing effects even if you have the Combine check box activated or hold down the Ctrl key.
The -/+ button is only available if the combo box is set to "Show All". It lets you collapse and expand all preset groups. After collapsing all groups you can expand individual groups by clicking the group header. If you only have one or two preset groups expanded, you do not need to scroll the preset list so much.
The arrow-left icon on the right-hand side of the Preset tab sheet is only available for the Thumbnails and Icons mode of the preset list. Clicking it expands the preset list to half of the window width and displays more thumbnails per row. At the same time the preview also gets smaller to make room for the larger preset list. Now the same icon uses an arrow that points to the right. Click again to collapse the preset list to its original width.