FLOWER POWER - THE CREATIVE USE OF FLOWER
PRESETS
INDEX
|
|
 |
| |
|
It's relatively easy to isolate some of my
preset flowers (which came with Plugin Galaxy) using your
graphics application. Having isolated a flower, there's no limit
to how you can use it! (There are some ideas in the Examples
pages.) Remember, as always, these tutorials are aimed at giving
you the basics to get you started with some useful techniques -
you can, and should, adapt everything to your own taste and the
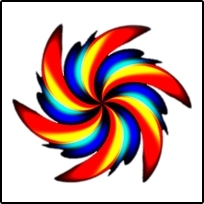
needs of an individual graphic. Start with the Red Gold Daisy
below, because it's easy. |
| |

-
Open a new 800 x 800 image (default for the
flower presets) with a white or light colored background
layer - this will show any flaws in your finished flower
when you remove the background color from the flower layer.
800 x 800 seems like a BIG flower, and it is, but scaling
the result down afterwards is actually a GOOD thing,
as you will see.
-
Add a new filled layer, any color - the
appropriate background color for the flower is provided
within the preset.
-
Open Plugin Galaxy then choose and apply the
flower preset.
-
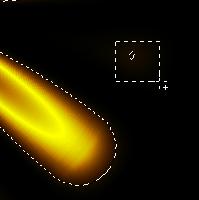
Back in your application, use your magic
wand to select the black background. Not all of the
background in all of the flowers will be pure black, so you
might have areas that need manual removing on the outer
edges of the image, or a few small selection spots between
or around the petals. You can either:
-
add these areas to your first selection
using one of the selection tools with your program's
"Add to Selection" option (usually the Alt or Shift
key); or
-
clear/delete the main black area, then
use any of the selection tools or the eraser to remove
any remaining unwanted background.
-
At this point, if your application has the
Selection>Modify>Smooth function (Photoshop CS2 does, not
sure about any other programs) you can round off the petals
as much or as little as you want. Selection smoothing was
used for the flower here, as the petal tips were quite
square.
-
As you can see, when the selection is
inverted and cleared against the white background layer,
there are some quite ugly jagged edges. However, as I
mentioned earlier, resizing is a GOOD thing. The third image
has been scaled down to a 200 x 200 image, and the jaggies
have instantly been taken care of. You can add a pass of
Blur More or a weak Gaussian blur before scaling down as
well, if necessary.
-
Finish the flowers off with the #Hoods -
Flower Center preset scaled, colored and shaded to your own
taste. A simple black paintbrush dot also works well with
many flowers.
|
|
|
|
|
ANOTHER WAY
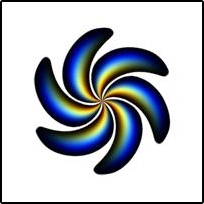
Try these alternative simple steps to isolate
flowers such as Fiery Blue, which doesn't have pointed petal
bases at its center like the Red Gold Daisy above. If you use
the method below "as is" on flowers like daisies, the central
area will be compromised by blurring. |
| The initial steps are exactly the same as those
described above. Having isolated the flower from the black
background as much as you can, you will be left with a fairly
rough looking flower with jagged black edges. |
-
Using your program's Blur More filter, only
once or twice, will get rid of any sharpness on edges of
color bands inside the petals. This is all you want to do
- don't be tempted to overblur, and don't bother trying to
smooth out the black outside edges at this stage.
-
Use your magic wand to select the
transparent area of the layer.
-
Modify>Expand the selection by 2-5 pixels,
judge how much for yourself. You want to increase the
selection just enough so that it moves into the black edges
without compromising anything else.
-
Apply a Gaussian Blur of 1-2 to the
selection area. Again, don't overblur - when you resize the
flower the smaller jaggies will be removed by the process.
The amount of blurring you see below left is ample.
-
Only if necessary, select the transparent
area again, expand the selection slightly and clear away 2-3
pixels of blurring.
-
When the image is downsized it will be fine!
|
|
 |
 |
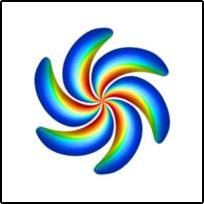
| Don't be afraid to try out some of
your program's features, or go back and use other
Plugin Galaxy color (or other) filters to modify the
finished flower. I thought the isolated flower below
left for the header graphic, then it took only a few
seconds to change it completely using a Hue
Saturation Lightness filter. There are more ideas
for use of extracted flowers in the Examples area. |
|
 |
 |
|
|