Edge & Frame Galaxy adds a menu item in the New Fill Layer sub menu of the Layer menu in Photoshop (Elements).
Supported by Photoshop
CS2/CC and higher, Photoshop Elements 11 and higher
Requirements: An RGB image has to be opened.
There are two ways to use Edge & Frame Galaxy: As a filter or as a fill layer. The fill layer is more flexible and reeditable whereas the filter effect can only be undone and reapplied. The filter version is more convenient if you do not want to manually edit the effect and only want to frame a photo.
The fill layer adds the frame effect as a new layer, which can be edited again by double clicking its thumbnail in the Layers panel or by selecting Edit Adjustment from the context menu of the Layers panel. Additionally the masking is provided as a layer mask and some effects are applied as layer effects, which can both be edited afterwards. In Photoshop you can edit the applied effects further with the Layer Style dialog. In Photoshop Elements you can either use the limited Style Settings dialog or use the enhanced Style Settings dialog of LayersXXL.
The Edge & Frame Galaxy dialog offers a Preset feature at the top as well as three tab sheets with options for adding a frame to the image and applying effects to it.
Preset
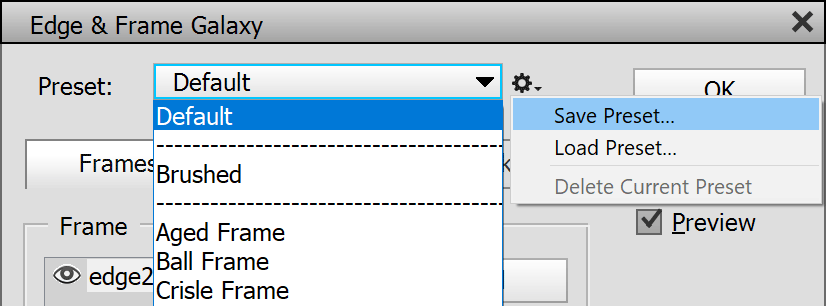
The Preset combo box contains preset items that apply various settings to the controls of a filter, fill or adjustment layer. Edge & Frame Galaxy comes with many presets, so there are plenty of effects to explore and test. The Default item at the top of the combo box list restores the default values for all controls. The Custom item at the bottom is automatically selected if a control is changed indicating that the original preset or default values are not used anymore.
You can also open a preset file from the icon menu at the right hand-side by clicking the Load Preset menu item. This displays a file dialog for selecting the preset file. Usually it is more convenient to select a preset from the combo box.
The Save Preset menu item saves the current settings as a preset file for later use. In the appearing file dialog best keep the preselected folder to make sure that the new preset appears in the Preset combo box. To delete a preset choose it from the combo box and then select the Delete Current Preset menu item. This removes the preset from the combo box but also deletes the corresponding preset file.
Frames
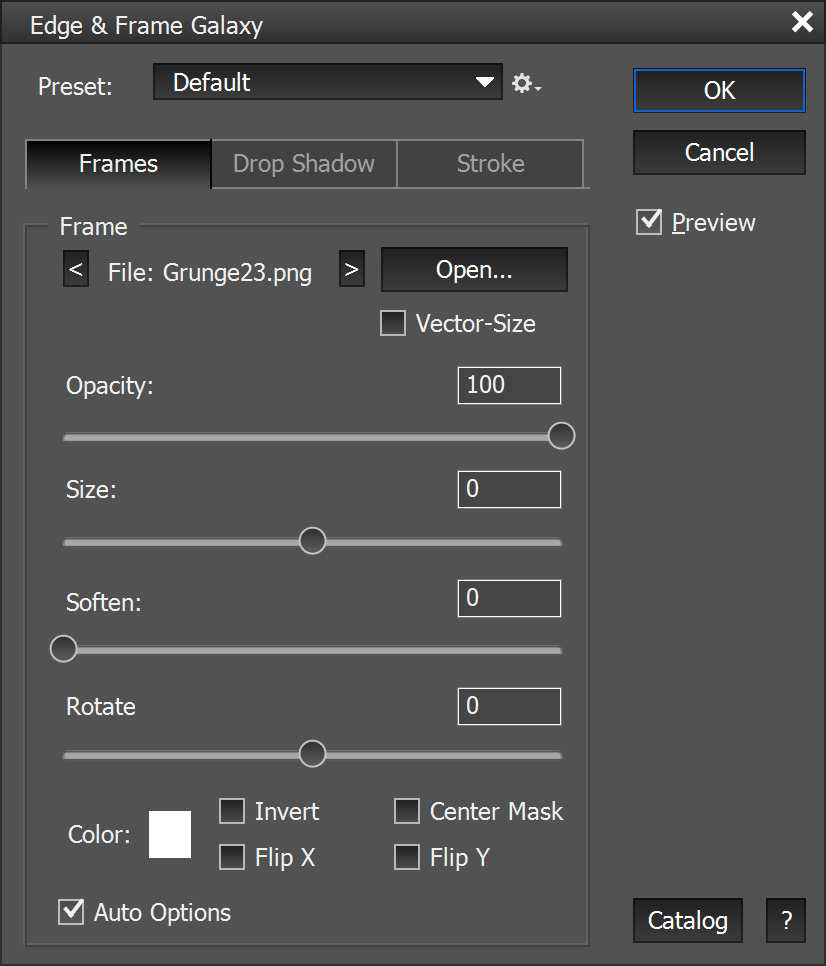

The Frames tab sheet offers controls for adding one or more frames to the current image.
By default a predefined edge or the last used edge or frame will be opened. To change the edge or frame file click on the Open button and select a new edge or frame file from the file dialog. Please set the file dialog to "Thumbnails" or "Large Icons" to see a preview of the edge and frame files. The < and > buttons switch between the files in the same folder as the opened edge or frame file.
The Vector-Size check box upscales low-resolution edges to high-resolution photos without causing a pixelation effect. This works best with simple-shaped edges. With textured edges or photographic frames it usually produces an unpleasant result.
The Opacity slider reduces the transparency of the currently selected frame and makes the image shine through. The Size slider increases or reduces the frame area thus making fewer or more image areas visible. The Soften slider blurs the frame edges for a more soft effect. Use the Rotate slider to rotate the edge or frame, e.g. to create a diagonal frame look.
Click the Color box for choosing another background color for the edge. The default color is white. This option does not work if the Center Mask check box is active. The Flip X/Y check boxes mirror the edge or frame horizontally or vertically. The Invert check box inverts the frame, so that it shows in the center of the image instead of the corners. The Center Mask check box uses a different method of adding the frame, which makes it possible to use more complex and colored frames. It only masks the center of the frame image and leaves the rest of the frame image untouched. If this check box is active, the color of the Color box is not applied anymore.
An active Auto Options check box automatically sets optimal settings for many of included edge and frame files. It does not work for files it does not know. For example it activates Vector Resize for low resolution edges to ensure that the borders are sharp and not slightly blurred from upsizing the edge image. For the includes frame files it automatically activates the Center Mask check box and resets slider values. It also internally provides masking coordinates for more unusual frame files. Deactivate Auto Options to keep the current settings when opening one of the included edge or frame files.
Drop Shadow


The Drop Shadow controls apply a shadow effect to the frame, which makes it look as if the frame floats above the background. Increase the Opacity slider to make the drop shadow effect more visible. Set it to zero to completely deactivate the effect. Use the Size slider to enlarge the drop shadow effect. Clicking the color box lets you choose the color of the drop shadow from a color dialog.
Bevel
The Bevel settings render a bevel effect to the borders of the frame. They provide the impression as if the frame is raised or sunken.
The Opacity slider makes the bevel effect more visible. Set it to zero to completely deactivate the effect. The Size slider increases or decreases the pixel size of the bevel effect. The Style combo box lets you place the bevel effect inside, outside or centered on the edge or frame borders. The Technique combo box provides different bevel looks from smooth to rough.
The Angle/Altitude control lets you adjust the lighting of the bevel effect by selecting the angle as well as the altitude of the light source. The invisible line between the center dot and the small white circle defines the angle. On the other hand the distance between the center dot and the small white circle defines the altitude of the bevel effect. Click somewhere within the circle to change both angle and altitude or enter them in the appropriate text boxes.
Stroke


The Stroke options add an outline to the borders of the frame effect.
The Opacity slider makes the stroke effect more visible. Set it to zero to completely deactivate it. The Size slider increases or decreases the pixel size of the outline. The Mode combo box defines the blend mode, which is used to combine the outline with the image. It provides different looks. The Color box defines the color of the stroking. Click on it to choose another color from a color dialog.
Glow
The Glow effect enables a shiny color effect around the borders of the edge or frame.
The Opacity slider makes the glow effect more visible. Set it to zero to completely deactivate it. The Size slider increases or decreases the pixel size of the glow. The Spread slider lets you make the glow more emphasized and almost turn it into a stroke effect. The Mode combo box defines the blend mode, which is used to combine the glow with the image. Experiment with it for different looking results. The Color box determines the color of the glow. Click on it to choose another color from a color dialog.
Click the ? button in the bottom right corner to display this manual. The Catalog button displays a 300-page PDF with thumbnails of all 5000 edges & frames and the path where you can find them.
After applying the Edge & Frame Galaxy fill layer (not the filter version) with OK, you can also edit the drop shadow, bevel, stroke and glow effects or add more effects by using the Style Settings dialog of LayersXXL in Photoshop Elements or the Layer Style dialog in Photoshop, which is available e.g. from the Layer > Layer Style sub menu.