
ElementsXXL adds 10 menu items to the Enhance Menu of Photoshop Elements.
Requirements: An image needs to be opened.
The Curves filter lets you change and improve the brightness and contrast of digital images by remapping the brightness values of the image. By default the "curve" is displayed as a diagonal line in the diagram, which means that the input and output values are the same and no adjustment is applied.
The curve can be adjusted with the help of points. To create a new point click somewhere in the diagram and drag. After releasing the mouse button a curve is drawn through the new point. You can adjust your point or add new points until you get the desired result. You can also adjust curve points by entering numbers in the Input and Output boxes. Alternatively draw your individual curve with the Pen tool and click the Smooth button to improve it. The Auto button automatically corrects the brightness, contrast and color of the image according to the settings displayed by the Options button.
The curve in the following screenshot shows a typical contrast adjustment with the help of an S curve consisting of three added points:
There are eye dropper tools for picking a black and white point (the darkest and brightest pixels) from the preview. Additionally the gray eye dropper performs a color correction when you click on a slightly colorized gray area in the preview. The hand tool lets you create and adjust a curve point by clicking and dragging on the preview. The Show Clipping check box visualizes image areas where the tonal values are cut off.
The screenshot below shows a typical curve for increasing brightness:
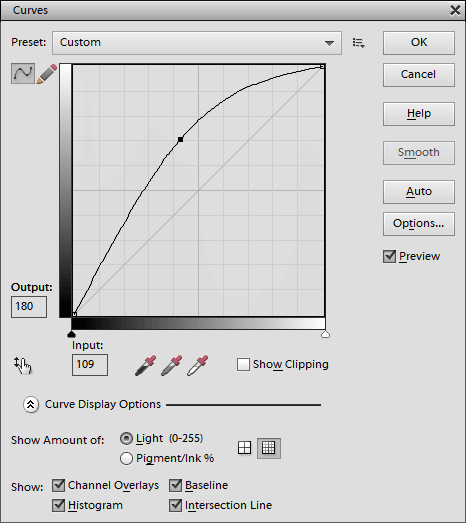
When clicking on the double arrow button at the bottom, more controls show up: Light is the default settings whereas Pigment/Ink simply inverts the values of both axes of the diagram, which makes the colors run from white to black and rotates the curve by 180 degree. The two diagram icons change the number of line in the diagram. The Channel Overlays check box shows the adjustments that were done with the three eyedropper tools. The Baseline check box removes or adds the diagonal line in the diagram. The Intersection Line check box displays crossing lines when you move a curve point. The Histogram check box only shows a clearly visible histogram in Photoshop Elements 6 to 10. In Photoshop Elements 11 and 12 the histogram is almost invisible.
Requirements: An image needs to be opened.
The Exposure filter changes the brightness of the image with three different methods. It is easier to use, but offers less control than the Curve filter.
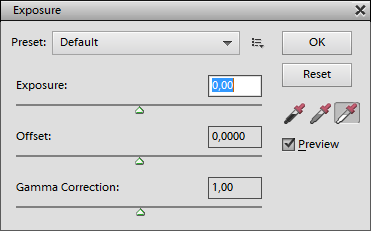
The Exposure slider adjusts the brightness of the image similar to the photographic exposure. The Offset slider moves the brightness values into a certain direction without taking shadow or highlight rescue measures. The Gamma Correction slider applies a brightness correction that is known from computer monitors and is similar to the middle slider of the Levels adjustment.
Again you have three eyedroppers for picking a black, gray and white point. They directly adjust the value of the Exposure or Offset slider.
Requirements: An image needs to be opened.
The Channel Mixer recomposes each color channel of an RGB image by blending the three RGB channels according to certain percentage values, which produces color effects. Additionally if the Monochrome check box is activated, you are able to create a black & white effect that is defined by a mix of the three color channels.
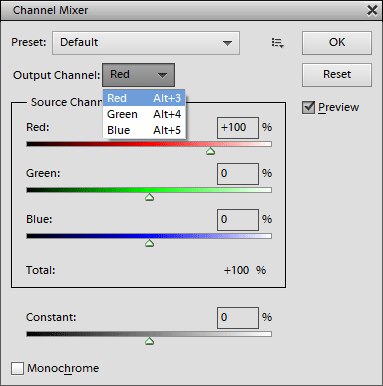
The Output Channel combo box selects the color channel that is affected by the four sliders. Each output channel option owns different slider values, so there are actually 12 slider values in total. The Red, Green and Blue sliders define the color mix that is used for the selected output channel. As long as the Total value of all three sliders is 100%, the brightness of the image is not affected. The Constant slider adjusts the brightness of the current output channel. To reset all values hold down the Opt key and click on the Cancel button, which is now named Reset.
Requirements: An image needs to be opened.
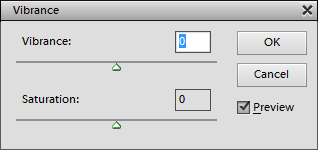
The Vibrance filter changes the saturation of the image. Whereas the Saturation slider produces a more or less standard saturation adjustment, the Vibrance slider additionally protects skin tones from getting too saturated.
Requirements: An image needs to be opened.
The Color Balance filter allows you to adjust the color of shadow, midtone and highlight areas separately.
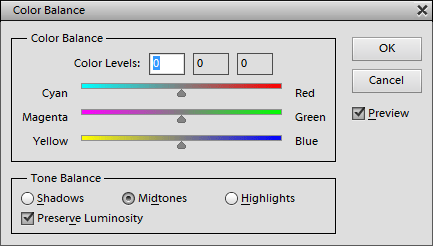
To select a certain tonal range click either the Shadows, Midtones or Highlights radio button. Each of these options allows different values for the three color sliders. The Preserve Luminosity check box keeps the brightness of the image unchanged while it is colorized.
Requirements: An image needs to be opened.
The Selective Color filters lets you independently adjust certain color and gray areas of the image. It is similar to the Adjust Hue/Saturation filter, but uses the CMYK color model instead of the HSL one, as you can see from the names of the sliders. Additionally it also allows adjusting white, neutral and black areas. On the other hand the adjustments of the Selective Color filter are less precise, because there is no feature for editing the color ranges.

Select the target color from the Colors combo box and use the sliders to change it. Each combo box option uses different slider values, so there are a total of 9 * 4 = 36 slider values. The two Method radio buttons at the bottom switch between different color adjustment methods. To reset all values hold down the Opt key and click on the Cancel button, which is now named Reset.
Supported by Photoshop
Elements 11-14
Requirements: An image needs to be opened.
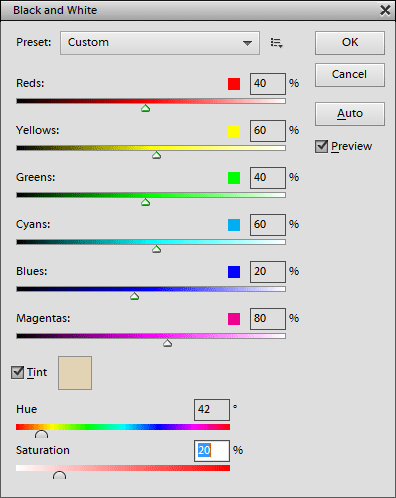
Similar to the Monochrome option of the Channel Mixer filter, the Black & White filter turns a color image into a grayscaled one. With six instead of three sliders for adjusting the black & white effect, you have more control, but it also gets more complicated. Additionally you can colorize the black & white image with the help of a color box and two color sliders.
 |
 |
The six top sliders define the black & white effect of the filter by mixing six different color channels, which are based on the RGB and CMY color models. To colorize the black and white effect activate the Tint check box. Now you can click on the color box to choose another color from a color dialog or use the Hue and Saturation sliders to adjust the color. The Auto button tries to find a balanced black & white mix by evaluating the image.
Requirements: An image needs to be opened.
These three simple sharpening filters apply the effect without showing a dialog. Sharpen More applies a stronger sharpening than the Sharpen filter. Sharpen Edges only sharpens the edges in the images. To reduce the effect of these filters either apply them to a layer and adjust its opacity or use the Edit > Fade command.