In Easy Mode, Classic Mode and Advanced Mode the control values on the Manual tab sheets are automatically set by the options on the Auto tab sheet. For finer control over the sharpening you can additionally use the manual controls. Changing the values of these controls will automatically deactivate the appropriate Auto feature(s) to avoid that the manual controls are reset.
The Manual tab sheet offers there methods: Single Radius, Dual Radius and Adaptive Radius. Although their effect is similar, Dual Radius offers more possibilities than Single Radius. The Adaptive Radius method offers more options than than Dual Radius when it comes to sharpening, but misses a softening/blurring feature. Some settings of the Auto tab sheet require two radius values or softening, so the Method combo box is then automatically switched from Single Radius or Adaptive Radius to Dual Radius.
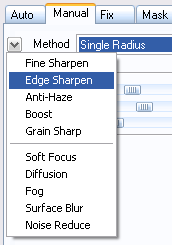
The arrow-down button left of the Method combo box displays a menu with several options that are known from Effect combo box of the Creative pass on the Auto tab sheet. The first five options produce sharpening effects and the other five apply blur effects. The blur effects automatically switch the Method combo box to "Dual Radius".
The Single Radius sharpening method is only available in Unsharp Mask mode and Advanced Mode. It is very similar to the good old Unsharp Mask with the exception that there is no Threshold slider, but a Surface slider. It is probably the easiest to learn of the three methods, because it only offer three sliders.
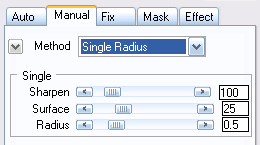
The Sharpen slider increases the total intensity of the sharpness effect. A value of zero produces no sharpening at all..

In the right image the
pure black areas are the surface areas. The sharpness of these areas is influenced
by the Surface slider.
The Surface sliders controls the amount of sharpening applied to the surface areas of the image. A value of zero only sharpens the edges, a value of 50 applies half as much sharpening to the surfaces than to the edge areas and a value of 100 sharpens the edges and surfaces with the same intensity. So the Surface controls the percentage of surface sharpening in relation to the edge sharpening. If the Sharpen slider is set to 200 and the Surface slider to 50, it means that the edges are sharpened with 200% (the value of the Sharpen slider) and the surfaces are sharpend with at 50% of 200, which is half as much and 100%. Good values for the surface slider lie between 25 and 50.
The Radius slider sets the size of the sharpening kernel. Small values emphasize small image details and large values make larger details more visible.
The Dual Radius method can assign a different radius for edge and surface areas. It also lets you blur the surface areas with two different blur effects.
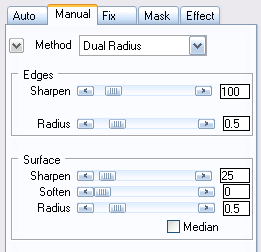
Edges
The controls of the Edges group sharpen the image edges. You can imagine edges as lines between two image areas of different brightness and color. If you imagine a photo as a pencil drawing, the black lines represent the edges.
The Sharpen slider determines the intensity of the sharpness effect that is applied to the edges. The Radius slider on the other hand lets you choose the size of the details that are emphasized in the edge areas. If you multiply the Radius value by 2 you get the pixel size of the affected details. Details that are smaller than the radius multiplied by 2 will be sharpened to a smaller extent.
In the right image the
pure black areas are the surface areas whereas the pure white areas are the
edges. Everything that is mid grey is a mixture of edges and surface areas and
influenced by both the Edges and Surface at a varying degree.
Surface
The controls of the Surface tab sheet are very similar to those of the Edges tab sheet. However, they only apply an effect to the surface areas in the image. The surface consists of the uniform areas in an image which have a very similar color and brightness. If you imagine a photo as a pencil drawing, the white background and gray filling stands for the surface.
The Sharpen slider determines the intensity of the sharpness effect that is applied to the surface of objects. The Radius slider lets you choose the size of the details that are emphasized in the surface areas. If you multiply the Radius value by 2 you get the pixel size of the affected details. Details that are smaller or larger than the Radius * 2 will less emphasized.
The Soften slider which isn't available in the Edges tab lets you smooth the surface areas. This can help to reduce noise in these areas, to weaken a sharpening effect or to give the image a softer look. If both the Sharpen and Soften sliders have a value larger than zero, each will weaken the effect of the other. Nevertheless the effect of the slider with the larger value will prevail.
If the Median check box is not activated the Soften slider uses a regular blur effect. If you activate the Median check box, a median blur effect will be used instead. The median effect does not blur image edges as much as the regular blur. It avoids halos around image edge, but needs a longer rendering time. It is only recommended to have the Median check box activated for softening, because its sharpening effect is much coarser. So better deactivate it if you want to do surface sharpening. Median sharpening is only useful for artistic purposes.
The Adaptive Radius method uses a so-called detail map for sharpening each pixel with a different radius value. The user can control the minimum and maximum radius values to achieve the desired sharpening effect.
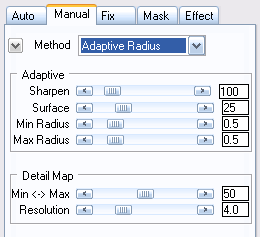
Adaptive
The Sharpen slider increases the intensity of the sharpness effect. A value of zero produces no sharpening at all.
The Surface sliders controls the amount of sharpening applied to the surface areas of the image. A value of zero only sharpens the edges, a value of 50 applies half as much sharpening to the surfaces than to the edge areas and a value of 100 sharpens the edges and surfaces with the same intensity. So the Surface controls the percentage of surface sharpening in relation to the edge sharpening. If the Sharpen slider is set to 200 and the Surface slider to 50, it means that the edges are sharpened with 200% (the value of the Sharpen slider) and the surfaces are sharpend with at 50% of 200, which is half as much and 100%. Good values for the surface slider lie between 25 and 50.
The Min Radius and Max Radius sliders define the minimum and maximum radius values that are used when assigning a radius to a pixel according to the detail map. For the best results Min Radius should usually be below 1.0 and Max Radius above 2.0. Good values are e.g. 0.5 and 4.0, but even values of 0.0 and 16.0 can create great sharpening effects.
Usually the Min Radius value should be smaller than the Max Radius value. If you use larger value for Min Radius than for Max Radius you will get a less natural appearing sharpening effect.
Detail Map
The detail map tells FocalBlade which areas of an image have smaller details and which have larger ones. Image areas that have smaller details are sharpened with smaller radius values and larger details in the image are sharpened with larger radius values.
The Min <-> Max slider lets you shift the balance toward the Min Radius value or towards the Max Radius values. Slider values below 50 assign radius values that are closer to the Min Radius value and slider values above 50 favor the Max Radius value more. This slider can be used to fine-tune the size of details that are emphasized by the sharpening. If you have an image with a lot of fine details, the sharpening can be improved by moving the slider knob to the left. For an image with many larger details it can help to use values higher than 50.
The Resolution slider controls the fineness of the details map. Higher values create a detail map of higher resolution. This result in more image areas being sharpened with a radius value close to Min Radius.