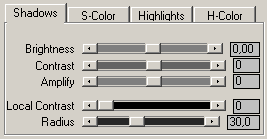
The controls on the first
tab sheet at the top can be used to correct the whole image in the Brightness/Contrast
modes, adjust the shadows in the Shadows/Highlights modes, brighten or darken
all spot lights in the Virtual Studio modes and modify certain color areas in
the Color modes. The controls on the third tab sheet are identical and let you
adjust the highlights or background areas.

Brightness
The Brightness slider doesn't work like the brightness or gamma sliders that are known from many graphics applications. It doesn't cut off shadows or highlights and also doesn't change the contrast. Its algorithm was specially developed for adjusting photos.
Its unit is EV (exposure values) and goes from -5.0 EV to +5.0 EV. Only very dark areas need an adjustment of +4.0 EV or higher. Images with average shadows only need adjustments of +1 or +2 EV. Above +4.5 EV, most images starts to lose too much contrast, so it is recommended not to use the highest value of +5.0 EV very often.
Contrast
The Contrast slider is much more sophisticated than any contrast features that are included with graphics applications. Values below zero can make some details more visible, but can create a more grayish look. Values above zero increase contrast and give the image more punch, but may make some shadow details less visible. Sometimes you have to reduce the contrast to match the look of a brightened area with its surroundings.
Amplify
The Amplify slider is meant to be used in addition to the Brightness and Contrast sliders. It offers further precision for brightness and contrast adjustments for difficult images. It performs a white point adjustment for positive values and a black point adjustment for negative values. Please use with care, because it can easily blow highlights or suppress shadows.
Local Contrast
If you drastically increase the brightness, an image can easily lose local contrast. That means the edges in the image get brighter, too, and are less distinguishable from the plain surface areas. To compensate for that effect you can use the Local Contrast slider. Try smaller values at first, because too high values may darken, desaturate or blow the highlights in the image too much. The additional Radius slider controls the pixel size of the local contrast effect. A higher value affects a larger image area. Using a Local Contrast adjustment can easily double the render time.
Local Contrast enhancement is basically sharpening with a high radius. Sharpening is usually applied with a low radius of 0.1 to max. 4.0 pixel whereas a radius of 8 to more than 1000 pixel is used for a local contrast adjustment. A local contrast adjustment increases the contrast in an image whereas sharpening makes image edges more recognizable. Local contrast enhancement and sharpening can be used in combination and don't exclude each other. However, I would only use a Local Contrast adjustment if all other contrast adjustments fail like it is the case for extremely brightened up image areas.