N, P, S, H
If one of these four buttons is activated you will see the mask that is used for the correction in the preview. The N button shows a negative view of the mask, the P buttons shows the positive version of the mask. The S buttons shows only the shadow areas, spot areas or selected color areas depending on which mode you are currently using. The H button shows the highlight or background areas.
If you have Split View and the Multiple check box active, you can use these four buttons to display the processed image side by side with the mask.
Managing Spots
LightMachine lets you create an unlimited number of spots. There is already one spot, which can't be deleted, available from the start.
![]()
To interaction with the spots you need to activate the cross tool above the preview. To create a new spot simply click with the cross tool somewhere on the preview. Click where you want to have it placed. A new spot always has the properties of the spot that was selected before the new spot was created. So if you want a new spot to have the properties of a existing spot, select that spot first.
The currently selected spot is always surrounded by a marquee and has a broken-up rectangle around its center cross. To select another spot simply click on its cross. Alternatively you can also use the numeric key to select one of the first 10 spots or use the Spot button menu (see below).
To drag a spot click on its cross and drag it by moving the mouse while keeping the left mouse buttons pressed. If the mouse is placed over the preview, you can also move the currently selected spot by 10 pixel with the cursor keys. If you additionally hold down the Ctrl key, the spot will be moved by 100 pixel. To delete a spot click the Del or Backspace key.
The spot that is selected can be adjusted with the controls from the Spot Mask tab sheet. If you want to adjust the properties of another spot, please select that spot.
The Spot Arrow-Down Menu
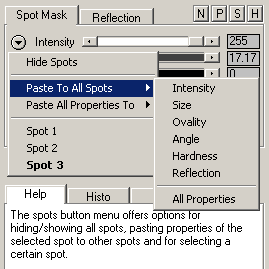
Clicking the small icon left of the Intensity slider displays the spot button menu. This menu contains commands for hiding and showing spots, pasting spot properties to other spots and selecting spots.
The Hide Spots command hides the cross of each spot light and the surrounding circle of the currently selected spot light. If you use too many spot light, these marks can obscure the image. So deactivating this button lets you see the image more clearly. If you want to makes them visible again, the button menu will offer the Show Spots command.
The Paste to all Spots sub menu lets you transfer certain or all properties of the currently selected spot to all available spots. This way you don't need to select each spot and adjust it individually if you want them to have the same properties. The Paste All Properties To sub menu lets you transfer all properties of the currently selected spot to one of the other spots.
Please remember that you only need to use these commands if all your spots are already created. Otherwise if you create a new spot it will automatically get the properties of the selected spot.
The Delete Spot command deletes the currently selected spot. Alternatively you can also use the Del or Backspace key.
Finally, the Spot commands at the bottom of the menu let you switch between the available spots. Clicking one one of the menu items will select that spot. The spots are numbered according to their creation time. The first spot that was created is Spot 1, the second is Spot 2 and so on. Alternatively you can also select a spot with the numeric keys, which is faster.
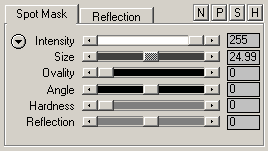
Intensity
The Intensity slider defines the intensity of the currently selected spot light. At a value of 255 the effects from the Spots and S-Color tab sheets (e.g. brightness, contrast or color) are applied at full intensity to image areas that are covered by the spot light. A value of zero deactivates the spot light. Values below zero turn the light spot into a shadow spot. At -255 the shadow spot has its highest intensity.
The effect of sliders on the Spots tab sheet (e.g. brightness and contrast) are uniformly applied to all spots. So the sliders on the Spots tab sheet should be set according to the brightest spot. The other spots can be made darker by selecting each one and decreasing the Intensity slider on the Spot Mask tab sheet.
Size
With the Size slider you can increase the size of the spot light in percent. The value refers to the width or height of the image (whichever is smaller). That means can be maximally as large as the image itself. The relative value of this slider means that you can use the same spots without any modifications with upsized or downsized versions of the same image.
Ovality and Angle
The Ovality slider lets you turn the circular spot light into an oval one. The higher the Ovality slider the thinner is the spotlight. The Angle slider only works if the Ovality slider is higher than zero. If the spot light is still totally circular, you can see any rotation because of the symmetry of a circle.
At a Angle value of zero an oval spotlight is orientated vertically. To get a horizontal spotlight, you need to set Angle to a value of 90.
Hardness
The Hardness slider makes the light of the spot harder, which means that the light is more concentrated on an area and less diffused. At a value of zero the spot light has is brighter in the middle than at the border areas. Increasing the Hardness of a spot light will make the middle areas brighter. The spot light appears bigger then, although it wasn't enlarged. A higher Hardness value will also make the transition area between the spot light and the outer areas smaller and less smooth. So a larger spot light is often a better alternative.
Reflection
The Reflection slider defines how much light is "reflected" from the image area that is covered by the currently selected spot light. A value of 100 will "reflect" all light, which means that the image area will be brightened at full intensity. That can easily produce blown highlight. The default value of zero often produces more natural results. Decreasing the Reflection value up to -100 will decrease the reflection even more and keep already bright areas from being brightened.
You can adjust the reflection properties of the whole image by adjusting the controls from the Reflection tab sheet. The settings of the controls on that tab sheet are applied to all spots and can't be set separately for each spot. These controls are identical to those of the Fine-Tune tabs sheet of the Shadows/Highlights modes. It may be a good ideas to adjust them in the Shadows/Highlights (Pro) mode and afterwards return back to the Virtual Studio (Pro) mode. With these controls you can precisely reduce the reflection of highlight areas, reduce halos that are produced by spot lights and much more.