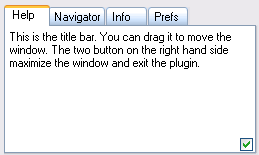
The Help sheet is located at the right bottom of the NoiseControl window. This feature was built in to make it easier for beginners to get started and makes it possible to use NoiseControl without a glance at the manual. If you move the mouse over a certain control, the text box will display some explanations and hints about the control.
After you know all about NoiseControl, you can deactivate these explanations by deactivating the check box at the right bottom of the help sheet. But we recommend that you keep it nevertheless activated. It may remind you of something that you already forgot or missed reading.
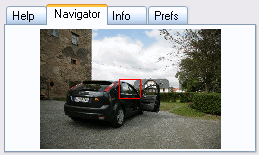
The Navigator tab works just like the Navigator panel in Photoshop. It displays a thumbnail of the image with a red rectangle that indicates which part of the image is displayed in the preview. You can use the Navigator to display a certain image area in the preview by clicking on it in the thumbnail. To quickly scroll around in the preview click somewhere on the thumbnail, hold down the mouse button and move the mouse.
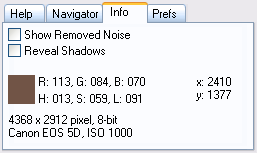
The Info tab shows information that is not essential but which may be helpful under certain circumstances.
The Show Removed Noise check box displays the image noise that was removed. It is similar to choosing the Difference blend mode on a layer with the processed image while having a layer with the original image underneath it.
The Reveal Shadows check box brightens up dark areas in the image, so that you can check if the noise was sufficiently removed there.
When moving the mouse over the preview, the color below the cursor is shown in the color box of the Info tab sheet. Additionally the color is shown as RGB and HSL values. The x and y values represent the image coordinates of the pixel whose color is shown. For images with 16-bit/channel the color values are shown as 8-bit values like in Photoshop.
The two lines at the bottom of the Info tab sheet show the image size in pixel and the channel bit depth. The second line displays the camera model and the ISO value with which the photo was taken. If no EXIF data is available, this line is empty.
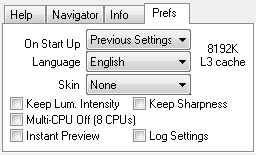
The Prefs tab sheet contains some options for defining the behavior of NoiseControl.
On Start Up
The On Start Up combo box
defines which settings are used when NoiseControl is started. The "Default
Settings" option sets all controls back to their default values. "Previous
Settings" loads the settings that were previously applied to an image.
"Own Defaults"
loads a self-defined preset file. If no preset file was previously chosen, a
file dialog appears. Otherwise use the "Define Own Defaults" item
of the Reset arrow menu to choose a new preset
file.
"Logged Settings" automatically opens the settings that were previously
applied to the same image. It only works in Photoshop, Photoshop Elements, Paint
Shop Pro and Photline. Additionally it only works if you previously had the
Log Settings check box activated and if you already processed the same image
file. See below for more information.
Language
The Language combo box switches between localizations of the NoiseControl dialog. You can only choose between English and German so far. When running NoiseControl for the first time, it will automatically be set to the language of your Windows installation.
Skin
The Skin combo box features various skin options. Skinning means that the user interface receives a new look. There are different options for imitating the user interface of Lightroom, Photoshop, Photoshop Elements, PaintShop Pro and Affinity Photo. There is also a dark version of Aero (the default UI style of Windows Vista/7), a special PhotoWiz skin style as well as an option to only skin the sliders. You can use a different skin for the plugin, standalone and Lightroom versions. The None option of the Skin combo box recreates the standard controls and deactivates skinning, which requires restarting the plugin or standalone.
Keep Lum. Intensity & Keep Sharpness
If the Keep Lum. Intensity check box is activated, the Intensity control of the Luminance Denoise group on the Manual tab sheet will not be changed by the Reset feature or when opening a preset. The same is true for the Sharpness control on the Enhance tab sheet if you activate the Keep Sharpness check box. Thus you can preserve your prefered luminance denosing intensity value and sharpness values and do not need to readjust them again.
Multi-CPU Off
If you encounter any problems, you can deactivate the support for multiple processors and hyperthreading pipes with this check box. If you only have a non-hyperthreading, single-core processor, this check box will be disabled by default.
Instant Preview
If the Instant Preview check box is activated, the preview is updated while you drag a slider. Instant Preview may work too slowly on computers with an older processor. You can also get the same effect if you hold down the Shift key while dragging a slider.
Log Settings
With activated Log Settings
check box NoiseControl automatically saves preset files in the logfiles sub folder
at
C:\Documents and Settings\<user>\Application Data\ThePluginSite\NoiseControl\
after you press the OK button. In Photoshop, Photoshop Elements, Paint
Shop Pro and Photline the file name of the image is used as the preset file
name. In other applications a random number is used, because these applications
don't supply the file name of the image to NoiseControl. If you apply NoiseControl
a second time to the same image and have Log Settings activated, the previous
preset file in the logfiles folder will be overwritten.
At least with Photoshop, Photoshop Elements, Paint Shop Pro and Photline this feature allows you to easily find the settings that you applied to a certain image by looking into the logfiles sub folder. For other applications you can only look at the file date and guess which preset file was used for which image.
In connection with the Logged Settings option of the On Start Up combo box (see above), you can use the Log Settings check box to automatically make NoiseControl start up with the settings that were applied the last time to the same image. So if you need to correct the same image again, you will automatically be presented with the same settings that you used the last time. In case you don't want to start up NoiseControl with the logged settings or forgot to activate this option, you can also open the logged settings by clicking the arrow button next to the Reset button and choosing "Logged Settings" from the button menu.