- Add a new layer to a new square image - say 200 x
200. Don't fill this layer with
color.
- Open Plugin Galaxy and the preset #Hoods - Instant
Bubble.
- If you do change the size of your image, you will have to
adjust the Size and Smooth controls on the Edge layer. These
two sliders work together to produce the bubble. The left
hand image at the bottom of the page shows a bubble that
hasn't been touched up at all, against a white background
layer.
Still inside Plugin Galaxy, you can now make further adjustments
if you want to.
- With the Rainbow layer selected, use Shift + Reset to restore the default
settings for the effect you choose (Twirl, Curl, whatever) - these
settings will generally
give you the best colors, or a better starting point. Tweak
them to your own taste.
- For a plain, single-color bubble, turn Off the Rainbow>Curl layer
and turn On the
top Rainbow>Linear layer, which is Off by default. Use the Angle and color sliders
to change colors. If you like, turn
both Rainbow layers On, and try different blend modes on
the upper layer.
- Increase or decrease the overall transparency of the
bubble by adjusting the blue General Blend slider a
little. (You
can also do this afterwards on the Layer palette in your
application, which is my preference.)
After applying the preset, you can choose how much you want
to touch the bubble up.
- You can add highlight(s) to the bubble. You can either use a
highlight as created for the Sphere, or a small rotated
white ellipse as seen in the header example. The ellipse
in the example was
feathered 2 px, so no blurring was necessary, but you
can blur more or less, as you choose.
- You can use both
styles of highlight together. You can also add color to the highlights etc. etc.
- lots of options! Whatever you choose to do, always create any
highlights on their own new layer. This makes it very
simple to create different bubbles on the Bubble layer with
instant highlight(s) ready for use above it.
- You can modify the bubble's inner transparency by erasing
with a brush or cutting out with
a feathered selection, as per the Sphere tutorial.
- You might prefer to cut away the
blurred edge created by the preset with an inverse circle selection, as per the Sphere
tutorial. However, when you scale down the bubbles these
edges will smooth themselves out, as seen below.
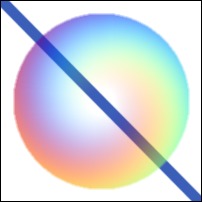
The bubble below left is exactly as instantly produced by the
preset on a 200 x 200 square - the only adjustment was to its size. The
line on the white background layer shows the default transparency
produced by the
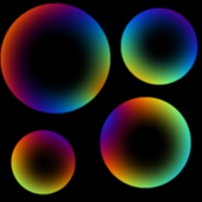
unchanged preset. The image on the right is the result of the "4
Bubble" preset applied to a 800 x 800 image then scaled down.
The centers were erased, but no other adjustments were made. As
you can see, scaling the bubbles down has removed any unevenness
in the default plugin smoothing of the outer circles. |