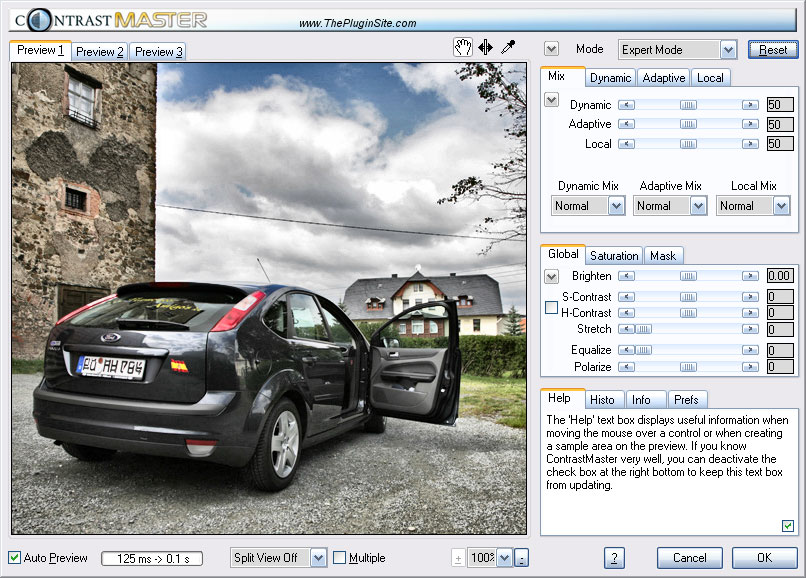
The Preview and Zoom options
On the left-hand side of the dialog box is the preview box that shows you what the final effect will look like. Controls to adjust the preview zoom level are located below the preview. You can zoom the image between 6% and 3200%. When starting ContrastMaster the zoom rate is automatically set to Fit, which displays the image completely in the preview. The 100% option means that the original size of the image is displayed. There are Fit and 100% buttons at the left for quickly switching between these zoom states. To jump from one preview zoom rate to another you can use the zoom combo box which is located between the two zoom buttons. With the Ctrl and minus/plus key shortcuts you can also change the zoom ratio.
Changing the Window Size
To resize the ContrastMaster window and make the preview larger under Windows you have to move your cursor to the border of the ContrastMaster dialog. The cursor will then turn into a double arrow. Holding down the left mouse button and dragging the mouse changes the size of the window. You can also drag the handle at the bottom right of the ContrastMaster dialog. Double maximize button on the right side of the ContrastMaster title enlarge the window to full screen. Clicking it again restores the old window size.
Enlarging the preview also increases the time that ContrastMaster needs to update it. On the other hand making it smaller makes ContrastMaster render the preview faster.
The Preview Tab Buttons
Above the preview you can see three tab buttons called Preview 1, Preview 2 and Preview 3. With their help you can quickly switch between three different filter settings and compare them. Only the effect of the selected Preview tab button will be rendered when you press OK. Right clicking on the tab buttons displays a context menu for copying the settings of the currently selected tab to one of the other tabs.
The Tool Icons
![]()
The hand icon is activated by default. The hand tool lets you scroll the image in the preview by dragging with the pressed down left mouse button. Even if the hand tool is not activated, you can always scroll the preview with the help of the right mouse button.
If you activate the eyedropper tool, you can click somewhere on the preview to select a certain color for one of the color boxes on the Mask tab sheet. The eyedropper tool is not available in Novice mode. Read more on the Mask Tab Sheet page.
The split view tool lets you drag the separation line between the split views or set a focus point if the Multiple check box is active. It automatically activates split view if you click on it. Read more on the Split View page.
The Modes
ContrastMaster features 6 different modes which can be selected from the Mode combo box at the top. When you run ContrastMaster for the first time you should explore Novice mode first. For more information on the various modes, please read the Modes page.
The
Reset Button
Clicking the Reset button sets all controls to their default values. This is useful if you want to start over with adjusting the effect. Clicking the arrow down button displays a context menu with various reset options. See the Reset & Global Presets page.
Sliders
Although there are various other controls available for adjusting the image effect the main controls are sliders. Sliders can be used to select a certain value within a specific value range. To do that you can drag the slider knob with the mouse (or keyboard), enter a numerical value in the white text box at the right of the slider bar, click somewhere on the slider bar for large value steps or use the two arrow buttons for small value steps. If the Instant Preview check box on the Prefs tab sheet is not activated, you can hold down the Shift key while dragging the slider knob to make the preview update with every movement of the knob. If the Instant Preview is activated, you don't need to hold down the Shift key for the same effect.
You can now also use the mouse wheel to change the slider values. You need to give the slider the focus by clicking on it or using the tab key. After that you can scroll the mouse wheel to move the slider knob. After you stopped moving the wheel the preview will automatically update.
The Bottom Tab Control
The Help tab sheet makes it easier for new users to get started and makes it possible to use ContrastMaster without a glance at the manual. It can provide useful hints and assist you in the B/W conversion process. If you move the mouse over a certain control, the text box will display some explanations and hints about that control. After you know all about ContrastMaster, you can deactivate these explanations by deactivating the check box in the bottom right corner of the Help box. We recommend that you keep it activated.
The Histo tab sheet displays various histogram of the image. The Info tab sheet shows color values of the image pixels. Finally, the Prefs tab sheet contains options for changing the general behavior of ContrastMaster. Please read further on the following pages: Histo Tab, Info Tab, Prefs Tab.
The Preview Check Box and
Progress Bar
A deactivated Preview check box does not render the effect and therefore does not display any effect in the preview. This way you can see before/after versions of the image and adjust a number of controls without provoking a repeated rendering of the effect. When the effect is rendered, you see a bar running from left to right in the progress bar control. After the rendering is completed and the preview updated, the time that was needed for rendering is displayed as well as an approximation of the time that is needed to render the full image.
Split View & Multi
ContrastMaster offers various split views for comparing the original with the processed image. To move the separation lines or set a focus point you need to activate the split view tool at the top right corner of the preview. For more information, please read the Split View page.
Open, Save, Exit or OK, Cancel
When using the Plugin version clicking on the OK button exits ContrastMaster and applies the effect to the image. The current settings are saved and restored when you use ContrastMaster again in case you have the Previous Settings item activated in the On Start Up combo box in Preferences. The Cancel button simply exits ContrastMaster without changing the image. If you hold down the CTRL key while clicking on Cancel, you will be prompted for Cloak Mode. In Cloak Mode the current settings will be applied to the images without displaying the ContrastMaster dialog. For more information, please read the Cloak Mode page. The Cloak Mode feature only works in the Plugin version.
When using the Lightroom version clicking the OK button makes ContrastMaster process the opened images. ContrastMaster automatically exits after all images were saved and you can continue working in Lightroom. Cancel exits ContrastMaster and does not apply an effect to the image(s).
In the Standalone version the Open button lets you can open one or more images with the help of a file dialog. The Save As button displays a file dialog for entering a file name and choosing the image format. Then it renders and saves the image. You can read more about it on the Standalone page.
You can also cancel or exit ContrastMaster by clicking on the x button in the title bar.
The ? buttons displays the html manual.
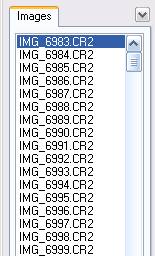
If you only open one image in the Lightroom version of ContrastMaster, you see no difference to the Plugin version. If you select two or more image in Lightroom, the Lightroom version of ContrastMaster displays an Images tab control left of the preview. This Image tab is also displayed in the Standalone version if you open more than one image. It lets you switch between the images.
As result of displaying the Images tab control the preview gets smaller. To increase the preview size again please enlarge the ContrastMaster window. See below for instructions.
![]()
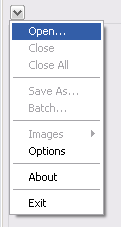
The Standalone version on the other hand offers a few more features than the Lightroom and Plugin versions of ContrastMaster. That is because it does not rely on another program for opening and saving image files. As a result the OK button of the Lightroom and Plugin versions is replaced by Open and Save As buttons for opening and saving image files. The Cancel button is called "Exit", which saves the effect settings unlike the Cancel button. Additionally the Standalone versions offers an arrow-down button in the top left area of the window below the title bar. Clicking on it displays an menu with various options.
Apart from these small extras and changes, all versions of ContrastMaster behave and work the same. For more information visit the Standalone/Lightroom Features page.