Plugins for Photoshop, Elements, Lightroom, PSP & others
Plugins for Photoshop, Elements, Lightroom, PSP & others
Applying the Edges in Picture Publisher
1. Open one of the edge files from the edge sub folder.
2. Open the photo file you want the edge to be applied to.
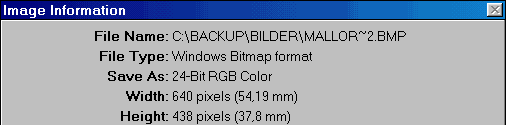
3. Get the information on the dimensions of the photo by pressing the ![]() button. A dialog similar to the above one will appear.
button. A dialog similar to the above one will appear.
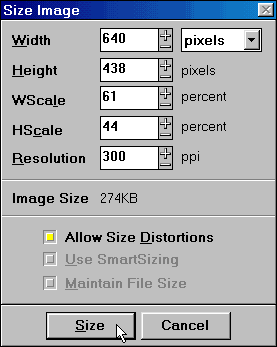
4. Activate the edge window and choose Size Image from the Image menu. Then enter the Width and Height, you read in the Image Information dialog of the photo. You will probably have to activate the "Allow Size Distortions" check box. Pressing the Size button will be resized the edge to the dimensions of the photo.
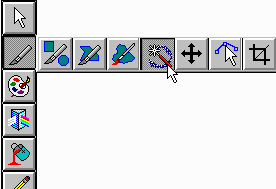
5. Select the magic wand tool as shown above and click with it on the inner white area of the edge. Press <Ins> or choose Invert Mask from the Mask menu.
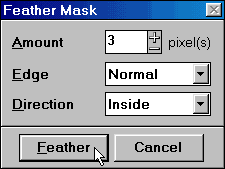
5b. If you want to soften the edge, choose Feather Mask from the Mask menu, enter the above settings and press the Feather button.
6. Then press <Ctl +C> to copy the edge to the clipboard.
7. Switch to the photo window and press <Ctl+ V> to paste the edge as a new object on top of the photo.
![]()
7b. You can use some of the features from the icon bar below the menu bar to change the frame appearance. E.g. clicking the Flip buttons will mirror the frame horizontally or vertically.
8. Finally if you don't want to make any changes anymore, combine the edge with the image by pressing <Ctl+Shift+F> or choosing Combine | All Objects with Base from the Object menu.
Using the above instructions will result in a black background. To get a white background at the end, invert the edge right by pressing <Ctl + I> after step 1.