Plugins for Photoshop, Elements, Lightroom, PSP & others
Plugins for Photoshop, Elements, Lightroom, PSP & others
Applying the Edges in PhotoDraw
To apply the edges and frames in PhotoDraw you will need to an plugins which I created.
I. Installing the necessary plugin
1. Download the file Msvcrt10.dll, unzip it and place it into your Windows System folder, if it isn't already there.
2. Download ApplyEdge.8bf and place it into the PhotoDraw plug-in folder (which is mentioned in the Plug-Ins tab of the Options dialog that can be activated from the Tools menu).
II. Applying Edges
1. Open a photo file in PhotoDraw
2. Use "From File" or "Visual Insert" from the Insert menu to open an edge file.
3. Use "Arrange" from the Arrange menu or simply use the handles of the frame that surrounds the edge to adapt the edge to the size of the photo.
4. Drag the edge over the image to make it cover the whole photo.
5. Select "Plug-ins" from the Effects button menu.
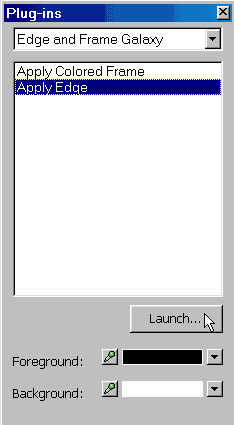
6. In the Plugins dialog select "Edge & Frame Galaxy" from the drop down menu at the top, select "Apply Edge" from the list box below and press the Launch button.
7. The inner area of the edge will now be transparent and lets the photo shine through.
8. If you want to turn the black outer border to white, apply the Negative effect from the Color button menu.
9. Finally you can still apply other effects e.g. the 3-D effect.