Plugins for Photoshop, Elements, Lightroom, PSP & others
Plugins for Photoshop, Elements, Lightroom, PSP & others
|
This tutorial explains how to run the PhotoWiz for Windows standalones on a Mac with an Intel CPU. You do not need a copy of Microsoft Windows to do this. You only need the free Wineskin software, which can be downloaded from the link below. For another similar tutorial see here.
1. Download Wineskin. 2. Double click the downloaded file to unzip it. 3. Double click the unzipped "Wineskin Winery" file.
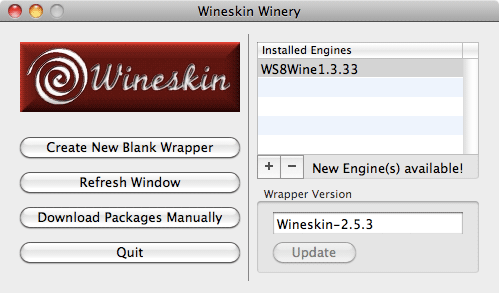
Creating
a Wrapper
4. On the Wineskin Winery dialog under "Wrapper Version" press the Update button to get the latest update of Wineskin. 5. Under "Installed Engines" click the + button to install an engine.
6. On the Add Engines dialog press the "Download and Install" button and press OK on the next dialog.
7. Click the "Create New Blank Wrapper" button. On the "Create a Wrapper" dialog enter the name of the standalone, e.g. "ColorWasher" or "FocalBlade". Do not use any spaces in the name. Then press OK.
8. When asked if you want to
accept an incoming network connection, click "Deny". 9. On the "Wine Gecko Installer"
dialog press "Cancel". 10. After a few seconds you will get a "Wrapper Creation Finished" message. Click the "View Wrapper in Finder" button on it to display the created wrapper in a Finder window. If you missed clicking that button, go to /<your username>/Applictations/Wineskin/ in the Finder.
Installing the Standalone 11. In the Finder window double click the wrapper icon, whose name you entered in step 7.
12. On the appearing Wineskin dialog press the "Install Windows Software" button. In the file dialog select the .exe file that your downloaded from our Download Center and press the Choose button. 13. Follow the instructions of the installation to install the standalone. 14. On the "Choose Executable" dialog make sure that the correct .exe file is selected, which is e.g. "ColorWasherDemo.exe" or "ColorWasher.exe" or "FocalBladeDemo.exe" or "FocalBlade.exe". Do not select the .exe with "LR" in its name. Usually the correct .exe file is already preselected. Finally click OK.
15. To assign an icon to the standalone please do the following: On the Wineskin dialog click the Advanced button. Then click the Browse button below "Icon". On the appearing file dialog choose the .icns file that you downloaded from the Download Center. Click the Choose button and then "Done". This step is optional. 16. Click the Quit button on the Wineskin dialog to exit.
Running the Standalone 17. In the Finder window double click the warpper icon, which is the same icon as in step 10. This time the standalone is launched.
Further Adjustments 18. If you want to add an icon on the desktop for quickly running the standalone, please do the following: Select the icon in the Wineskin folder and choose File > Make Alias from the top menu. Now drag the newly created alias file to the desktop. Now you can launch the standalone by double clicking this icon on the desktop. 19. To readjust the Wineskin settings right click the wrapper icon and select "Show Package Contents" from the appearing menu. Then double click the Wineskin icon in the new Finder window. 20. It is possible to add an XP dialog theme to the standalone, but we do not recommend that, because there will be various redrawing problems. But you can change the dialog colors of the standalone and other settings by running Wineskin (see previous step) and clicking Advanced > Tools > Config Utility (wincfg) > Desktop Integration.
|