Plugins for Photoshop, Elements, Lightroom, PSP & others
Plugins for Photoshop, Elements, Lightroom, PSP & others

Luminar 3
by Kay Michael Kuhnlein
|
||||
Normally you will find the following hint at the end of the review, but this time I will do it the other way round: Please visit ?https://skylum.com invest $69, or if necessary, just test the downloadable trial version at first. Already at this point you will get a very positive information: You do NOT have to borrow Luminar 3, you buy it at the already mentioned $69 and then it is yours. I like that so much more than with the other company... Gosh, what was their name? I have just forgotten it at the moment.
You are in the right place when you see this sign on your PC or Mac. I promise that you will have a lot of fun with image editing! While writing I received the information that Luminar 3.0.2. is available, an update which implements customer requests. Before my review will be published by Harald Heim on his website, there is already the new version ready, of course also as a downloadable trial version. The website of Skylum is ideally designed. Here you can find any help you can think of as well as user instructions in different languages. Luminar3 is suited for both, hobby photographers and professionals. I am even going one step further, with Luminar3 your work will really turn into pleasure, just try it! Luminar3 can be installed as a plugin for Photoshop and Lightroom or alternatively be run as a standalone version. Actually I would be able to forego the following sentences as it can already be read in my earlier reviews. But you may probably not have noted it, for this reason once again: This is no manual for all existing features, but only a general overview, just a review.
Since December 2018 Luminar3 has integrated a library that leaves no wishes unfulfilled. Search the saving locations of your images, newly sort them? if necessary, create new files or add new folders of your existing selection.
Clear and manageable - Photographers: Silvia Kuhnlein, Harald Heim and Leoncool With the example shown here you mark the desired destination folder and Luminar3 shows you all images from the selected folder. At the upper left-hand side you will additionally be informed about the time period in which the photos were taken as well as the absolute number of the found and displayed images. From here all images can be rearranged, renamed etc. If you are not completely satisfied with the user interface, then you will find a lot of setting options in order to personalize it. ?
With the button? >Add Filters ?you will get into the folder of the settings and filters. They are divided into categories which makes the search easier. According to your needs you can now carry out the desired enhancements or effects on your images. It is taken for granted that there are also other ways of opening an image or call up the settings. You can save all own settings as presets, ideal if you have a huge number of photos which are longing for an identical improvement.
AI helps you processing your Photos Luminar3 offers 3 filters which are supported by artificial intelligence and which dramatically facilitate your work.
Via Quick & Awesome you can - among other things - call up the filter Accent AI and AI Sky Enhancer. With a slider provided for each filter you easily improve your photo. Both filters work with artificial intelligence which makes a dozen of manual adjustments superfluous. My conclusion: They are practical, quick and very effective, you should test?them yourself.
Presets, Presets and even more Presets What a smoothly working feature! Presets can simply be imposed on the image with a mouse click - you do not have to do more. But you can also work differently: Start with a preset, change the settings or add more filters, then you save the altered preset and have completely personal settings.
When installing Luminar 3 only a part of the presets are added.?If you like more of them, go to the website of the manufacturer, where you can find free preset downloads. Of course you already guessed it. You can also purchase presets there. They are divided into groups in order to assist you somewhat. But nobody forces you to actually use these pre-made effects. As you will instantly see, there is also a different approach with surprising and presentable results.
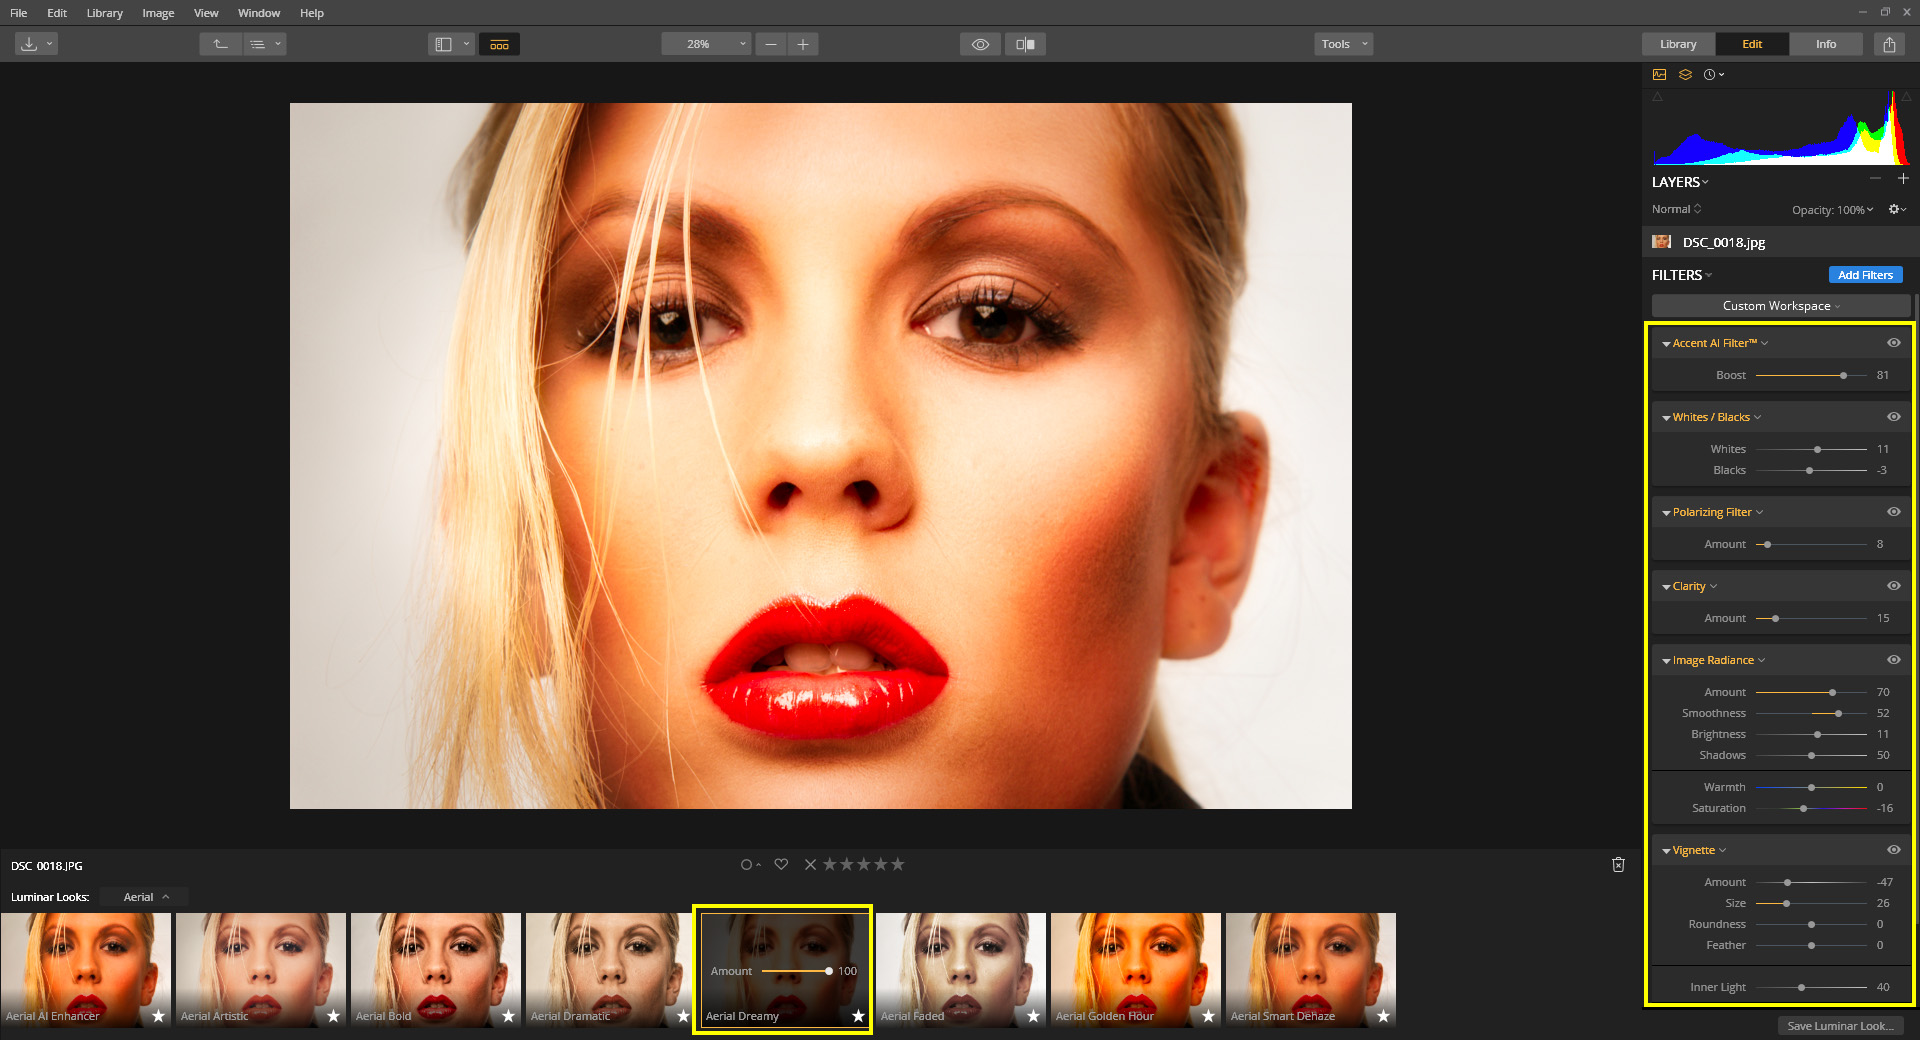
It is completely simple, one mouse click on the group Aerial und and a further mouse click follows on the Aerial Dreamy. That was it, two mouse clicks and I have a result that meets my demands. A view on the right-hand side of the user interface shows you that 6 different filters made their contribution here. If you feel like doing so, change the settings and save the new result under a new name. Now you have your own preset!
This time I used the preset Food Photo Enhancer from the group Lifestyle. As you can see on the screenshot here have also been used 6 different filters which can be changed. The car look really yummy now! Another note in order to prevent you from thinking that this might be my own car. It is of course not my car. I would not even be able to afford the steering wheel. Obviously I have done something wrong in my life so far.
In order to realize what I am longing for I can select suitable filters from the filter list or look for a suitable preset. I remember having already informed you earlier that I am lazy and if there is an easy way this will definitely be my choice.? Here I am firstly looking for the group Portrait in the preset selection. Hurray, there are two B&W ? options available. The small thumbnails make me hopeful. A single click on the preset?B&W Matte Portrait and I have reached my goal.
I am overwhelmed how little time I need to produce a great image.? Dependent on the original image it may be possible that it nevertheless takes some more time, until you have found the right settings.
Recoloring without a Mask Should you e.g. create artwork in popart-style then you know the problem from your own experience. The original image is - for whatever reason - supposed to receive a new coloring. If you?used 30 or more objects for this purpose, a lot of work is awaiting you.
Let us assume that you created the work in Photoshop and each object is located on its own layer including a layer mask. Well, then go on and equip each layer with a new desired color. I am too lazy .. ahem ... intelligent to do that.
With Luminar 3 and a mouse click this works faster ?? Artwork: Kay Michael Kuhnlein ? www.a-dezign.de My timeless method with one mouse click may probably not seem professional enough to one or the other reader, but you cannot say it for the result.?The group Dramatic with the preset Film Noir was used. Don?t forget that, if you like, you are allowed to set all sliders individually with any filter, so you do not need to shy away from using this method as a professional.
Original Image and Layer Right, with Luminar 3 you can add layers if desired which can be another photo or an adjustment layer as shown in the following example.
You can see from the screenshot that 3 filters were applied on the original image.
The adjustment Layer with?5 filters was set to Color blending with an opacity of 82%. Of course, these values are only useful for my example image. For your own images you will have to experiment a bit. So we have come down to the end of the review, although Luminar 3 still features a lot of more options for image procession. It is by no means wrong if you follow my recommendation at the beginning of the review. Buy this software or test it at least with the downloadable trail version. I wish you a lot of fun with it as well as plenty of great and presentable photos. Kay Michael Kuhnlein
|
Return to the Main Reviews page