|
Review of Mystical Tint, Tone & Color
2 from Auto FX Software
by Roberto Muscia
With this review I will try to give you a good overview of what
Mystical Tint, Tone & Color 2 is supposed to be used for, its
strengths and its weaknesses. Enjoy reading...
DESCRIPTION
Mystical Tint, Tone & Color is software for adding more life
and dynamic to otherwise average or even boring photos and is available
for both, Microsoft Windows and Macintosh operating systems. Everybody
knows how impressive photos look in commercial publications like
in magazines, books, newspapers, photo galleries, advertisements
and brochures. Also in the private sector one regularly gets the
impression of witnessing some outstanding photography in e.g. special
occasion prints like family or wedding photo albums or even framed
poster sized photo prints. The very majority of these photos have
been retouched to glorify, exaggerate or even fraud the contents
of the original photo.
For retouching photos one can either use generally available tools
and a LOT of skills and patience, or one can take advantage of software
that is designed for that purpose. Mystical Tint, Tone and Color
2 fits in the latter category. It offers a well equipped backpack
of filters and masking flexibility for turning photos into pieces
of art and worth publishing.
The collection of included filters covers a wide range of color,
B/W, tinting, tonal, dark-room, softening and HDR effects as well
as tools for adjusting skin smoothness, flesh tones, hair color,
lip color, eye color and distortion filters for subtle local reshaping.
So pretty much everything that is required for turning imperfect
shots or models into ideal ones and for adding a subtle or intensive
mood change. The quality of filters ranges from average to excellent
but balancing way more to the latter. Special effect tools are NOT
included, though. So you won't find anything particularly designed
for lens artifact correction, lighting creativity, depth of field
adjustments, sophisticated sharpening, advanced white-balancing
or 3D effects, framing, etc.
FILE SUPPORT
For opening and saving files, the supported formats are single layer
psd, bmp, tif, png and jpg images. In the stand-alone one image
at a time can be opened and a result can be saved. When using the
plugin the image from the host application can be edited and once
you apply the effect in the plugin, the image or active layer in
the host application will be replaced. Useful and quite unique is
that in the plugin one can actually save (intermediate) results
prior to actually applying the effect and going back to the host
application. In popularity growing 48 bit images can be opened,
although the 16 bits per channel images seem to be processed (and
saved) as ordinary 8 bits per channel images. Saving results to
jpg doesn't allow the user to set the compression level.
DIALOG
Mystical Tint, Tone and Color 2 can either be accessed as a stand-alone
application or through the plugins menu in an image editor supporting
Adobe Photoshop-compatible plugins. A number of keyboard shortcuts
are identical to the ones used in Adobe Photoshop, including the
taskbar to switch to Pan tool. The plugin can be used for batch
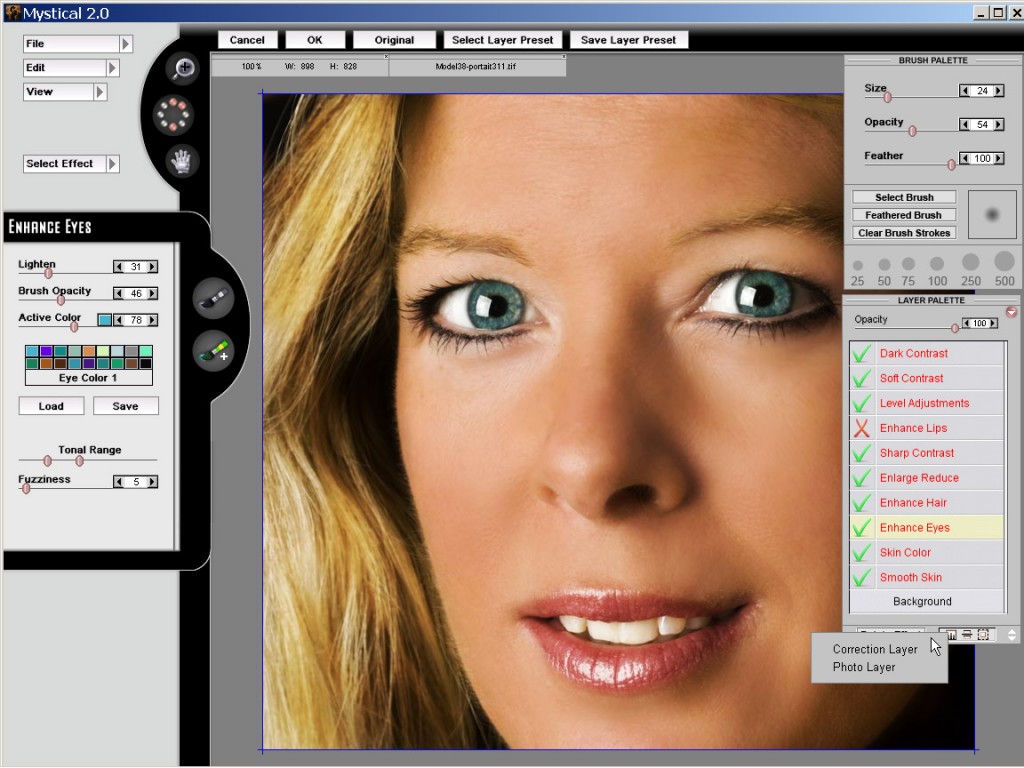
processing. The good-looking, custom-colors, dialog has a very large
preview area and is remarkably complete for an effect tool or plugin:
one might think it is an image editor on its own, dedicated to photo
retouching due to the large number and types of included filters,
the powerful selection, brush and masking features and a mature
layer style setup. It actually goes beyond that: per layer one can
always change effect filter settings and mask settings later at-any-time!
Unfortunately there's no histogram display option, which often is
helpful in photo editing. One might appreciate the (eight) memory
dots feature for temporary saving current and restoring previous
results. However, memory dot settings are lost after closing the
program.
At default the mouse-over-tool help feature is turned on: when placing
the cursor over a tool a helpful text about the tool will pop up.
This, while experimenting, probably is the best means of guidance
you will get when learning to use the program since in the pdf-manual
mainly the most obvious features are discussed quite plainly while
it is lacking from explaining the use of more sophisticated features
like masking.

PRESETS
Mystical Tint, Tone & Color 2 comes with far over 300 Layer
Preset effects, ranging from good to excellent usability. The layout
of the Layer Presets dialog is extremely convenient to use: all
preset effects are organized in expandable/ collapsible subcategories
and, once a subcategory is selected, very large (before + after
effect!) thumbnail preset example images are shown. The thumbnail
preview window is scrollable which makes it easy to visually browse
through the hundreds of pre-created effects quickly and pick one
that already is close to the result you had in mind. One can load
presets to apply them to the original loaded photo or even "append"
them on top of the current effect applied to your image in progress.
Mystical Tint, Tone & Color 2 also allows one to save presets
to the Layer Presets library.

INDIVIDUAL FILTERS
The Effect Menu button in Mystical Tint, Tone & Color 2 is the
access point to any of the built-in individual filters: no less
than 60 individual filters are supplied (against 39 filters in version
1!). All effects have kind of descriptive names and they are conveniently
arranged in categories so it's relatively easy to find what you're
looking for. The effectivity of the filters generally is spot-on.
No crap between them; only average, good and excellent filters.
It's a large bucket of sixty filters so sometimes it still might
be hard to navigate solely on filter names. However, it doesn't
take a long time experimenting until one gets a good feeling of
what to expect from which filter. The very most filters come with
a variety of controls for adjusting the effect. A very neat and
convenient detail is that after changing the setting of any control,
the preview update is briefly paused: this allows one to change
other controls as well without the need to wait until the preview
is updated between changing other control settings. Same for the
mouse-over help text: a short pause before popping up avoids annoyances
when you are quickly working with controls you already know.
The Effect Menu contains some often used simple effect producing
filters while most of them are actually pretty advanced and dedicated
to the task. Therefore the use of time-consuming default tools in
an (even advanced) image editor for retouching photos hardly can
be considered as a reasonable alternative option, once Mystical
Tint, Tone & Color is installed. Possibly counter-intuitive,
but you won't find any basic image correction tools in the Effects
Menu. For that purpose you need to add a "Correction Layer" on top
of the current effect layer. Once a new filter is chosen, the Effect
Panel in the left-hand-side of the dialog will show the effect-related
controls for that filter and a new layer is added to the layer stack,
just above the previous active layer.
LAYERS
Mystical Tint, Tone & Color 2 uses a layers approach although
with extra flexibility: instead of the effect layers containing
images, they rather hold the settings of a particular filter effect
and apply them to the resulting effect of the layers below. This
"non-destructive filtering" approach means that the originally loaded
photo is kept untouched and that the stack of layers in fact is
a stack of re-adjustable effects applied on top of each other, possibly
with re-editable Masking Layers in between them.
The basic layers concept remains: a higher layer effect affects
all layers below unless some areas of the images/ layers below are
more or less protected from being affected by masks.
One can add new effects (as new layers), delete them, duplicate
layers, add (movable and resizable) Photo Layers (= importing an
external image and place it in the image you are working on), add
Correction Layers (= allowing you to do basic image correction tasks
like brightness and contrast) and add Masking Layers. External mask
images also can be loaded as a layer. The opacity of each layer
can be set individually but for some reason there are no opacity
blending type options available.
Stacking layers on top of each other is an intuitive and flexible
way of turning images into what was intended: especially when each
effect or layer keeps maintaining its full ability of being re-edited.
The whole stack of layers is shown in the movable Layers Palette
in where you can find several layer feature buttons (in the bottom
of the palette) and a presets access menu (in the top-right of the
palette). Layers can be moved up- and downwards in the layer stack.
The Layers Palette also allows one to temporary disabling one or
more layers by clicking on the green checkmark (changing into a
red cross). Mouse-over any layer in the Layers Panel will show you
a -quite large- thumbnail of the intermediate result of all effects
applied (from bottom) up to that particular layer. When many layers
had been added, the Layers Palette resize arrow button (in the very
bottom-right of the palette) comes to handy: clicking on it, you
can drag the palette vertically larger (or smaller). Layer names
can be changed by double-clicking on a layer and changing the active
layer is easily done by single-clicking on one; then the contents
of the Effect Panel will be updated with the appropriate filter
controls for that layer/ effect. Consequently, the user truly has
a lot of flexibility with using layers.
SELECTIONS & MASKS
By using Masking Layers one can either protect underlying layers
from being affected by upper layer effects or let the effects of
upper layer filters only apply to selected areas. In Effect Layers
one can use local Selection tools to control which image areas are
affected by the current effect (as if an invisible Masking Layer
is embedded into the Effect Layer).

The quick local Selection tools in Effect Layers are the "Gradient
Path" tool and the "Create Ellipses" tool; both are available in
most filters. The Gradient Path tool lets you add one or more linear
gradient transition masking areas in any direction and with any
blending width. The Ellipse tools offer a simple and yet generally
effective way of masking on its own already. Ellipses have an inner
and outer radius (to feather the selection) and can be added, deleted,
moved, reshaped, resized and rotated.
More flexibility with selections can be achieved by adding one or
more Masking Layers. Basically, masks are greyscale images of simple
selections or a (complex) group of selections -either feathered
or unfeathered- and the greytone represents the amount of effect
that is applied. For a more convenient use the display color (default
is red) of the selections in a mask can be set to any semi-transparent
color in Mystical Tint, Tone & Color since a greyscale one is
often unpractical to use.
In Masking Layers several main selection tools are available like
a Masking Marquee (rectangle), Lasso and Straight Edge lasso tool.
Initially the use of all these tools is for adding a selection to
the mask. But by holding down the Alt-key they also can be used
for removing (parts of) selections. For fine-tuning selection edges
in a Masking Layer the Mask Selection Brush, Mask Selection Eraser
tool and the brush for locally enlarging or reducing selections
can be of great help. Image analyzing selection tools are missing,
though: for example, there is no Magic Wand or Select Color Range
tool. The brush-related tools have custom brush size, opacity and
feather options. The main selection tools are treated differently
from the brushes: brush strokes can be erased or restored without
affecting the main selections in that single mask (layer).
Apart from the selections in a Masking Layer to act straight-forward
you have the additional option to invert the resulting selection
in the layer.
Extra options allow the user to let a Masking Layer selection to
behave totally independent from any lower layer masks or to combine
with them. When the type of the loaded image supports transparency
then the transparent area also is treated as a selection ("Original
Mask"). All these advanced masking tools are not the easiest matter
to get the hang of while it is hardly or not explained in the manual,
but once you get a feeling of it, incredible powerful, really. The
mouse-over tool tip feature is a valuable guide; to get started
at least.
Instead of creating a selection in a Masking Layer manually, one
also can load external (images to use as) masks (File - Load a mask)
or select one of the built-in masks: in most filters the Effect
Mask tool is available, which you can use to access the Effect Mask
Catalog with over 40 ready-to-use masks. In the Effect Mask Catalog
you can browse through common and less common mask images (thumbnails)
and pick a mask that fits your goal.
EFFECT BRUSHES
These truly precious gems in Mystical Tint, Tone & Color 2 allow
you to retouch images locally in a very controlled and intuitive
way. Due to these powerful -in most filters available- Brush-On
and Brush-Off tools, great retouching achievements can quickly be
realized even without (!) the need of using any of the sophisticated
masking tools available in Mystical Tint, Tone & Color 2.
In fact, these two brushes together with the loaded Effect Menu
make the software already an easy to use dedicated retouching Diesel
engine!
The brush size, opacity and feather of the brushes can be set individually
in the movable Brush Palette. With adding brush strokes you basically
locally paint with "filter effect ink" where you want it and how
much of it (Brush On mode) or the filter effect is applied to the
whole image and the brush is used to locally reduce filter effect
(Global mode). One brush is used for increasing, the other for decreasing
effect while both brushes act cumulative in opacity: two strokes
over the same path increases "filter effect opacity".
Unfortunately currently Mystical Tint, Tone & Color 2 doesn't
support pressure sensitive pens; you can use the pen but need to
set brush options manually as if you're using a mouse. That doesn't
take away using a pen is much more convenient for detailed retouching.
For deleting all brush strokes at once the "Clear Brush strokes"
button in the Brush Palette can come to handy. Masks and selections
are dominant over brushes: when an area is already masked you cannot
overrule protected areas with a brush.
PROS
- Convenient and clear dialog.
- Very easy to use, effective and intuitive tools for local and
full image retouching.
- Large and divers set of well-targeted photo retouching filters.
- Many built-in time-saving effective instant solution presets,
covering a competitive diversity of photo retouching tasks.
- Filter control settings in individual layers can be re-adjusted
any time.
- High flexibility in combining effects and in applying them either
to the image globally or locally.
- Thorough set of masking and selection tools.
- Mouse-over help texts are extended and educational.
- Supports several common photo file formats.
- Plugin version offers tight integration with Adobe Photoshop (-compatible
plugins supporting image editors).
- Intermediate results can be saved in Plugin version.
CONS
- Pressure sensitive pens (pen-tablet) not supported.
- No true 48-bits image support.
- No image analyzing selection tools (e.g. Select Color Range, Magic
Wand).
- Manual not complete; features that likely require guidance are
not discussed while already obvious features are.
- The program has no multiple layers supporting native file format
to save the project in; results can only be saved as single layer
file formats. The only way to store a re-editable project is saving
a Layers Preset and keep the original image with it.
- The price of $249 for this well performing photo retouching suite
is a bargain for businesses but over the top for users who don't
make money out of photo retouching. However, considering the number
of included well performing filters, it would be more expensive
to alternatively buy a bunch of affordable competitive single goal
filters.
CONCLUSION
Without doubt, Mystical Tint, Tone & Color 2 is a well performing
work-horse for photo retouching in production environments and for
(semi-) professionals. It allows people to gain significant savings
in retouching time and efforts without compromising on results.
If you have serious interests in high level photo retouching I definitely
would recommend at least to have a play with the demo for an evening
or so. I'm pretty sure you love it and might eventually decide it
is exactly what you want for retouching your photos !
|